|
aremgy
|
 |
« on: March 04, 2011, 08:31:18 pm » |
|
O F F S E T


This tut was written on March 4, 2011.
It is written using PSPX; I'm sure the same effects are available in other versions.
SUPPLIES
A tube and an optional closeup.
I'm using the work of Ismael Rac. You need to purchase a license to use this work at his store HERE.
The following filters:
Simple - Zoom Out and Flip
Xenofex2 - Constellation
MuRa's Meister - Copies
Font of choice (I'm using "Aphrodite Pro")
Let's begin!
Set your foreground to white, your background to a lighter color of your tube.
Open a new image, 600x250
Fill with a linear gradient (Angle = 0; Repeats = 0; you want the white on top.)
Simple - Zoom Out and Flip using the default setting.
Change your background color to a darker shade (or a contrasting shade) of your tube.
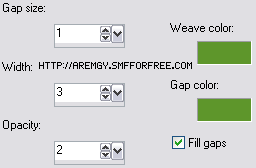
Effects - Texture Effects - Weave using the following setting:
(change both color boxes to your new background color.)
You will need to really zoom in on your tag (I used the scroll wheel on my mouse.)
Using your magic wand, click on ONE of the darker dots in the weave pattern

Zoom back out to continue.
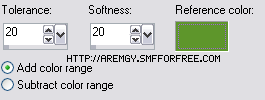
Selections - Modify - Select Color Range using the following setting:
(Use your background color as the Reference Color.)
Selections - Promote Selection As Layer.
Selections - Select None.
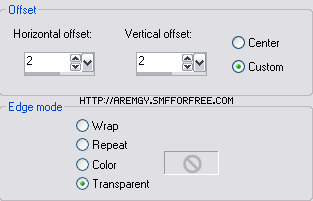
Working on the promoted layer, Effects - Image Effects - Offset using the following setting:
Duplicate this layer twice (for a total of three.)
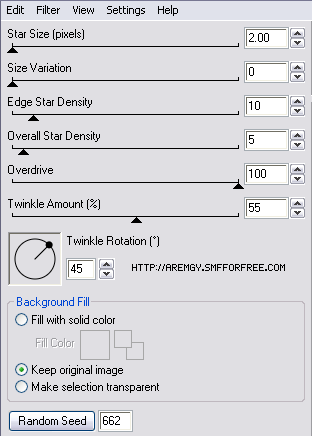
On each layer, Xenofex2 - Constellation using the following setting:
(Click the Reset button each time.)
Hide all these layers for now.
Add a new raster layer.
Selection Tool - Custom Selection using the following setting:
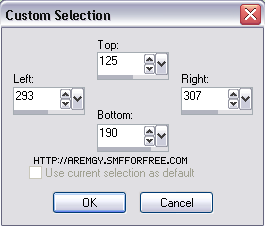
Fill with your darker background color.
Selections - Select None.
Duplicate this layer twice (for a total of three.)
On the bottom layer, Effects - Image Effects - Offset using 0, -25, Transparent.
Change the layer opacity to 50.
On the middle layer, Effects - Image Effects - Offset using 0, 50, Transparent.
Change the layer opacity to 50.
Layers - Merge Visible.
MuRa's Meister - Copies using the Line preset (changing the Number from 8 to 25.)
Unhide all the layers.
Add your closeup tube (if using).
Move it directly above your background layer, below the Constellation layers.
Change the layer setting to Luminance (Legacy) and the layer opacity to 40.
Highlight the top layer.
Add your tube layer, along with a blurry drop shadow.
Add a 2px Selection border, using your dark color.
Add your name and all necessary copyright information.
Animate as usual.
For the avatar:
Duplicate your tag (Shift + D.)
Delete the layer with your tubes.
Crop to 150x150.
Add your 2 pixel selections border.
Add your name (or initial.)
You may, if you wish, choose to animate your avatar.
Here is another example, using the work of Lady Mishka:


|
|
|
|
« Last Edit: July 11, 2011, 11:04:28 am by aremgy »
|
Report Spam
 Logged
|
|
|
|
|


|
Spawn
Newbie

Posts: 7

|
|
« Reply #1 on: March 05, 2011, 06:18:29 am » |
|
|
|
|
|
|
Shirley
Newbie
Posts: 22
|
|
« Reply #2 on: March 06, 2011, 01:22:13 pm » |
|
Oooh I just saw this-thank you Rich!!!
I just Love it and I can't wait til I have some time to give it a whirl-it looks like a fun tut!
|
|
|
|
|
|
|
aremgy
|
|
« Reply #4 on: March 08, 2011, 07:26:47 am » |
|
awww, SB...how sweet  these are both stunning, thanks! |
|
|
|
|
susy
Newbie
Posts: 21
|
|
« Reply #5 on: March 09, 2011, 08:49:26 am » |
|
Thanks, Rich. Loved the tut only I couldn't get the bar to look like the tut with one of the settings for the offset. Where it says...... On the middle layer, Effects - Image Effects - Offset using 0, 50, Transparent.
Change the layer opacity to 50.The middle layer didn't work for me with the 0,50 setting, so I used 0, 25 or is it optional cause I see some of the others' bars are taller. LOL I made you this set.   Well, I see that PB is down for maintenance. The set should pop in here anytime. LMBO!! |
|
|
|
« Last Edit: March 09, 2011, 10:20:49 am by susy »
|
Report Spam
Logged
|
|
|
|
Araceli
Newbie
Posts: 20
|
|
« Reply #6 on: April 21, 2011, 10:01:40 am » |
|
Me encantó el tutorial, y sin animación tambien se obtiene un buen resultado, genial!    |
|
|
|
|
LyNx
Newbie
Posts: 3
Love one another and you will never go wrong ...

|
|
« Reply #7 on: January 20, 2012, 05:12:16 pm » |
|
Here is my go at this tut ...   |
|
|
|
« Last Edit: January 20, 2012, 07:12:53 pm by LyNx »
|
Report Spam
Logged
|
|
|
|
|
aremgy
|
|
« Reply #8 on: January 20, 2012, 05:36:36 pm » |
|
lovely... thanks for trying the tut huggs R |
|
|
|
|
|
|
|

