|
aremgy
|
 |
« on: November 10, 2010, 06:59:23 pm » |
|
W A V I E R


This tut was written on November 10, 2010.
It is written using PSPX; I'm sure the same effects are available in other versions.
SUPPLIES
A tube.
I'm using the work of Elias Chatzoudis. You need to purchase a license to use this work at MPT.
The following filters:
MuRa's Meister - Copies
Xero - Fritallary
You will also need Animation Shop with its Underwater effect.
Font of choice (I'm using "Swan Song")
Let's begin!
Pick a light foreground color, and a darker background color.
Open a new image, 600x250.
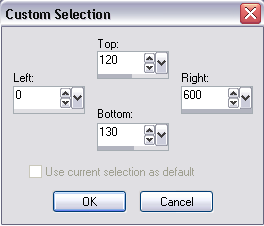
Selection Tools - Custom Selection using the following setting:
Fill with your darker color.
Selections - Select None.
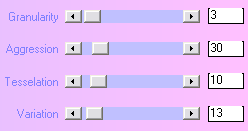
MuRa's Meister - Copies using the Tiling(angle) preset, changing the Tile Gap to 3.
Edit - Copy.
In Animation Shop, Edit - Paste as New Animation.
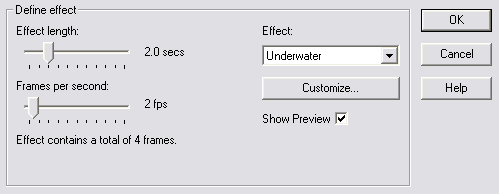
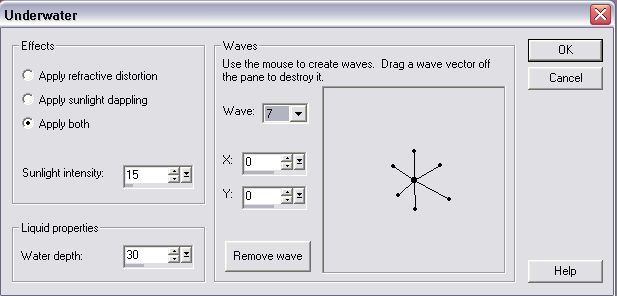
Effects - Insert Image Effect - Underwater using the following setting:
There will be five frames - highlight the first frame and DELETE.
Edit - Select All.
Edit - Copy.
Back in PSP, Edit - Paste As New Image.
(This new image has the four frames of the animation as separate layers.)
On each of the layers, Adjust - Add/Remove Noise - Add Noise using 35, uniform, Monochromatic checked.
Make sure all four layers are unhidden, and Save As a .pspimage.
(Remember where you saved it!)
Back in AS, open the newly saved image.
Set this aside for now, and go back to PSP.
Time to make the background!
Open a new image, 600x250.
Fill with your lighter color.
Xero - Fritallary using the following setting:
Effects - Edge Effects - Enhance.
Edit - Copy.
In AS, Edit - Paste as New Animation.
Duplicate this frame so you have four frames total (CTRL +Shift + L 3x).
Edit - Select All on both the wavy frames and the background frames.
On the wavy frames, Edit - Copy.
On the background frames, Edit - Paste Into Selected Frame.
Carefully move the wavy frames into position.
Animation - Frame Properties, change from 10 to 25.
Back in PSP, working on the background layer, add your tubes as a new layer.
Xero - Porcelian (optional - change Blue to 0.)
Add a blurry drop shadow (I used Eye Candy 5 Impact - Perspective Shadow.)
Add a 2px selection border using your darker color.
Add your name and all necessary copyright information.
Hide the background layer, Layers - Merge Visible.
Edit - Copy.
Take to AS and repeat to add to the frames you did earlier.
For the avatar, I made a copy of the animation before adding the tube.
Then cropped it, and added an initial.
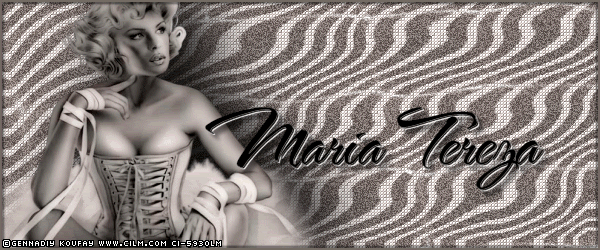
Here is another example, using the work of Gennadiy Koufay:

|
|
|
|
« Last Edit: March 04, 2011, 08:38:35 pm by aremgy »
|
Report Spam
 Logged
|
|
|
|
|


|
|
|
|
aremgy
|
|
« Reply #2 on: November 14, 2010, 09:42:00 pm » |
|
WOW!!
are these ever nice...
thanks, SB!!
|
|
|
|
|
susy
Newbie

Posts: 21

|
|
« Reply #3 on: January 01, 2011, 10:06:50 pm » |
|
I want to do this tut so bad but it's not working for me.
I'm not getting the stripes like yours.
Something is wrong with my "Copies" setting and I've checked it over and over.
Whaaaaaa!
Mine doesn't look at all like this.
I want to do zebra stripes like Sherribabe but it's not working.
|
|
|
|
|
|
aremgy
|
|
« Reply #4 on: January 01, 2011, 10:29:37 pm » |
|
hi, hun  what you want are diagonal stripes with a little bit of a gap between them, i think (it's been awhile since i've made this tut...) if you can get them, you shouldn't have trouble with the rest... please let me know if that works for you... huggs R |
|
|
|
|
susy
Newbie
Posts: 21
|
|
« Reply #5 on: January 02, 2011, 05:40:03 am » |
|
OK, Rich, I got it but my Meister Copies settings are different than the tut. I made the selection 600x25 and then when I added "copies", I set the gap at 6 instead of 3. I suppose it could be left at 3 but it made my stripes narrow. Don't know why it took such a difference in the settings but it works for me.LOL  |
|
|
|
« Last Edit: January 02, 2011, 06:21:44 am by susy »
|
Report Spam
Logged
|
|
|
|
|
|
|

