|
aremgy
|
 |
« on: October 22, 2010, 04:39:48 pm » |
|
G R I D


This tut was written on October 20, 2010.
It is written using PSPX; I'm sure the same effects are available in other versions.
SUPPLIES
A tube.
I'm using the work of Ismael Rac. You need to purchase a license to use this work from his store HERE.
The following filters:
RCS Filter Pack 1.0 - Screenworks Grid available HERE
DSBFlux - Bright Noise
Word art of choice (optional).
Font of choice (I'm using "Esperanza").
You will also need this element:

(This is a .PNG file. Right click and save to your computer.)
Let's begin!
Pick two colors from your tube - a lighter color in the foreground, a darker color in the background.
Open a new image, 600x250.
Fill with the darker color.
Add the element you saved as a new layer.
Selections - Select All
Selections - Float
Selections - Defloat
Add a new layer, and fill with the lighter color.
(You'll have to zoom in to see the selection to fill.)
Selections - Select None.
Add a new layer.
Fill with a foreground gradient - Sunburst, Repeats = 3.
RCS Filter Pack 1.0 Screenworks - Grid using the default setting.
Using your magic wand, click on a black portion of the layer.
DELETE
Selections - Select None.
Selection Tool - Custom Selection using the following setting:
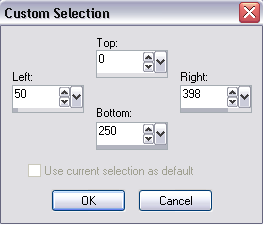
On the layer with the element, hit DELETE.
Selections - Invert
On the layer with the gradient, hit DELETE.
Selections - Select None.
Still on the gradient layer, add a sharp drop shadow (I used 1, 1, 100, 1, black).
Duplicate this layer 2x.
On each of the gradient layers, DSB Flux - Bright Noise using Intensity = 47.
Hit the radial button in front of Mix each time.
Add your tube, and a blurry drop shadow (I used Eye Candy 5: Impact - Perspective Shadow with the Blurry preset).
Add a 2px selection border in your darker color.
Add your name, and any necessary copyright information.
Animate as usual.
For the avatar:
Duplicate your tag (Shift + D.)
Remove the layer with your main tube.
Crop to 150x150.
Add your 2 pixel selections border.
Add your name (or initial.)
You may, if you wish, choose to animate your avatar.
Here is another example, using the work of Anna Marine:


|
|
|
|
« Last Edit: March 04, 2011, 08:36:02 pm by aremgy »
|
Report Spam
 Logged
|
|
|
|
|


|
|
|
|
aremgy
|
|
« Reply #2 on: October 26, 2010, 06:01:50 pm » |
|
just lovely, Miss Sherri....
thanks so much!
huggs
R
|
|
|
|
|
|
|
|
aremgy
|
|
« Reply #4 on: November 12, 2010, 03:47:40 pm » |
|
just lovely....
|
|
|
|
|
AprilakaCCIL
Newbie

Posts: 4

|
|
« Reply #5 on: November 21, 2010, 06:16:37 pm » |
|
Cool Tut!!! Can't wait to try this one out.  |
|
|
|
|
Spawn
Newbie
Posts: 7
|
|
« Reply #6 on: November 21, 2010, 10:19:33 pm » |
|
so versatile, can suit any tube, just wicked love it
|
|
|
|
|
|
|
|

