|
aremgy
|
 |
« on: August 24, 2010, 08:40:24 pm » |
|
MAGIC


This tut was written on August 24, 2010.
It is written using PSPX; I'm sure the same effects are available in other versions.
SUPPLIES
A tube.
I'm using the work of Deacon Black. You need to purchase a license to use this work from CILM.
The following filters:
MuRa's Meister - Clouds and Copies
Greg's Factory Output, Vol. II - Pool Shadow
RCS Filter Pack 1 (you can download that HERE
Fonts of choice (I'm using "Impact", "Bank Gothic Light", and "Firefly Alternate").
Let's begin!
Pick two colors from your tube, one darker and one lighter.
Open a new image, 600x250.
Floodfill with a gradient using your two colors - Linear; Angle = 0; Repeats = 7.
Edit - Copy.
In AS, Edit - Paste - As New Animation.
Effects - Insert Image Effect - Underwater using the following setting:
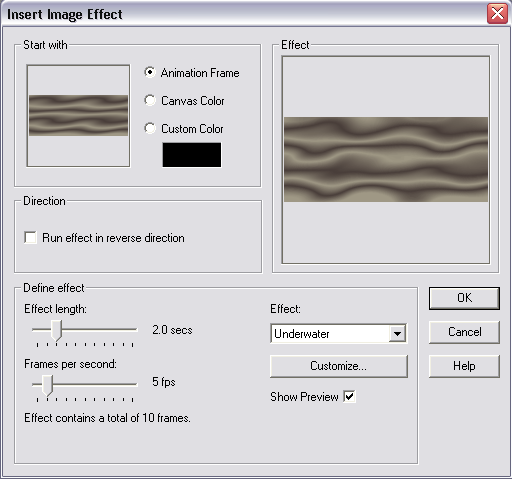 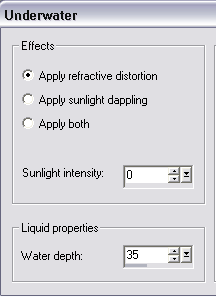
(**NOTE** - Check to make sure you click on "Apply refractive distortion" ONLY - no sunlight dappling, no waves - you may have to put a 1 in the Sunlight Intensity box.)
You will have 11 frames.
Click on the first frame, and DELETE.
Set this aside for a moment, and move back to PSP.
Duplicate the gradient layer.
On the bottom layer, Effects - Texture Effects - Weave using the following setting:
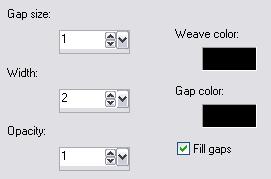
Change the opacity of this layer to 35.
On the top gradient layer, RCS Filter Pack 1 - Window Shades II using the default setting.
Effects - Edge Effects - Enhance.
Change from the gradient back to the darker color.
Using "Impact", size 96, type out the word (or words) of your choice.
(Use the vector setting so you can stretch your word art to fit.)
When you have stretched it into position, Layers - Convert to Raster Layer.
Selections - Select All.
Selections - Float.
Selections - Defloat.
Highlight the top gradient layer and hit DELETE.
Selections - Select None.
Delete the word art layer.
On the top layer, Effects - 3D Effects - Drop Shadow using 0, 0, 100, 10, black.
Add your tube, moving it into position.
Add the same drop shadow.
Add a 2pixel selection border using the darker color.
Add your name, and any necessary copyright and licensing information.
Make sure all layers are unhidden and Edit - Copy Merged.
In AS, Edit - Paste - Paste as New Animation.
Duplicate this frame so you have a total of 10 frames.
Edit - Select All.
Edit - Copy.
On the background you animated earlier, Edit - Select All.
Edit - Paste Into Selected Frame.
Move your mouse over the first frame of the background animation.
Carefully, center your merged frame so that no edges are showing.
When you are happy, release the mouse button.
If you error, click Edit - Undo and try again.
We're done, so save your new tag!
For the avatar:
In PSP, delete your tube layer.
Crop to 150x150.
Add your name or initial.
Here is another example, using the work of Robert Alvarado:


|
|
|
|
« Last Edit: October 23, 2010, 01:02:26 pm by aremgy »
|
Report Spam
 Logged
|
|
|
|
|


|
huronna
Newbie

Posts: 15

|
|
« Reply #1 on: August 25, 2010, 11:23:37 am » |
|
I really liked this one 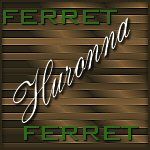  |
|
|
|
susy
Newbie
Posts: 21
|
|
« Reply #2 on: August 27, 2010, 08:19:44 am » |
|
Yeow, the ads here are big! LOL Thanks, Rich, for this geat tut. Duh, stupid me.......never dawned on me to post my results here. I've done a lot of these tuts. When I have time I'll dig them up and post them. Here's my "Magic". Huronna, yours is beautiful! Love the tube!   |
|
|
|
« Last Edit: August 27, 2010, 08:22:05 am by susy »
|
Report Spam
Logged
|
|
|
|
|
aremgy
|
|
« Reply #3 on: August 27, 2010, 10:30:22 am » |
|
just beautiful, Miss Huronna and miss susy! glad you like the tut  |
|
|
|
|
Nickel
Newbie
Posts: 12
|
|
« Reply #4 on: September 01, 2010, 04:38:30 pm » |
|
My try ... love this tut.   |
|
|
|
gagejennifer
Newbie
Posts: 15
|
|
« Reply #5 on: January 28, 2012, 08:13:38 pm » |
|
Having trouble with this tut. When I get to the part where it says in AS to put the image that was created in psp (the 'wave' image) over the tag, all im getting is the waves frames themselves and its not going into the text. What am I doing wrong ?.
|
|
|
|
|
|
aremgy
|
|
« Reply #6 on: January 28, 2012, 08:42:16 pm » |
|
Having trouble with this tut. When I get to the part where it says in AS to put the image that was created in psp (the 'wave' image) over the tag, all im getting is the waves frames themselves and its not going into the text. What am I doing wrong ?.
you add the text image on top of the wave image - not the other way around. if you put the wave layer on top, the text layer will be hidden. |
|
|
|
|
|
|
|

