|
aremgy
|
 |
« on: August 11, 2010, 10:10:58 pm » |
|
SEQUINS


This tut was written on August 11, 2010.
It is written using PSPX; I'm sure the same effects are available in other versions.
SUPPLIES
A tube.
I'm using the work of Jessica Dougherty. You need to purchase a license to use this work from CILM.
The following filters:
MuRa's Meister - Clouds and Copies
Greg's Factory Output, Vol. II - Pool Shadow
RCS Filter Pack 1 (you can download that HERE
Fonts of choice (I'm using "Luxury Royale", "News Gothic Becker", and "Cherish").
Let's begin!
Pick two colors from your tube, one darker and one lighter.
Open a new image, 600x250.
MuRa's Meister - Clouds using the default setting.
(You may have to click the Reset button.)
Add/Remove Noise - Add Noise - Gaussian, 12, Monochrome checked.
Greg's Factory Output, Vol. II - Pool Shadow using the default setting, but change Intensity to 50.
Add your tube, moving it into position.
Crop your image to 600x250 to get rid of any excess.
Duplicate your tube layer.
On the bottom layer, MuRa's Meister - Copies using the default Tiling (feedback) setting.
Duplicate the MuRa's layer.
On the top MuRa's layer, Adjust - Radial Blur using Zoom, Blur Strength 100, Elliptical checked, all other boxes at 0.
Effects - Edge Effects - Enhance More.
On the bottom MuRa's layer, RCS Filter Pack 1 - RCS Sequins using the default setting.
Effects - Edge Effects - Enhance.
Change the layer setting on the Sequins layer to Soft Light.
Change the opacity on the Radial Blur layer to 36.
You may want to repeat the Edge Effect - Enhance on the Sequins layer to make it pop!
Hide the tube layer, Layers - Merge - Merge Visible.
Unhide the tube layer and add a nice, blurry drop shadow (I used Eye Candy 5 - Perspective Shadow.)
Add any word art you wish.
(I wrote "California Gurls" using Luxury Royale and changed the layer setting to Soft Light.)
Add a 2 pixel selection border using your dark color.
Add any necessary copyright and licensing information.
For the avatar:
Make a copy of the image (Shift + D).
Delete any unnecessary layers.
Crop to 150x150.
Add your name or initial.
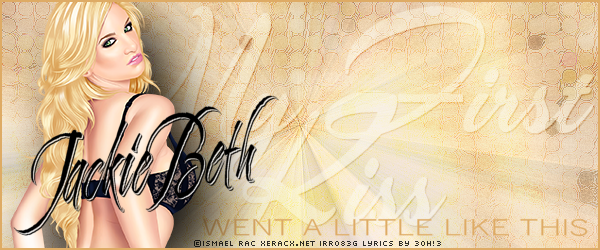
Here is another example, using the work of Ismael Rac:

|
|
|
|
« Last Edit: October 23, 2010, 01:03:30 pm by aremgy »
|
Report Spam
 Logged
|
|
|
|
|


|
Shirley
Newbie

Posts: 22

|
|
« Reply #1 on: August 11, 2010, 11:31:04 pm » |
|
Amazing tut- I have bookmarked this one to try for sure!
|
|
|
|
MelbGyrl
Newbie
Posts: 3
|
|
« Reply #2 on: August 14, 2010, 11:43:53 pm » |
|
Stunning!!
|
|
|
|
|
|
sherribabe
|
|
« Reply #3 on: October 03, 2010, 11:24:35 am » |
|
I used the lyrics from one of my all time favorite 1980's songs... It seemed to fit the look of the tube. Hope you like!    |
|
|
|
|
|
|

