|
aremgy
|
 |
« on: August 04, 2010, 04:56:57 pm » |
|
THE JITTERS

This tut was written on August 4, 2010.
It is written using PSPX; I'm sure the same effects are available in other versions.
SUPPLIES
A tube.
I'm using the work of Robert Alvarado. You need to purchase a license to use this work from MPT.
The following filters:
MuRa's Meister - Copies
AAA Filters - Good Vibrations
Greg's Factory Output, Vol. II - Pool Shadow
Font of choice (I'm using "Firepower BB").
You will also need the mask you can make in my tut "UNHIDDEN".
If you've completed that tut, you may have it saved.
If not, you can find it and make the mask HERE
Let's begin!
First, resize the tube so the height is 350p.
Layers - Load/Save Mask - Load Mask from Disk
(or, if you've just made it, Layers - New Mask Layer - From Image)
Adjust - Sharpness - Sharpen.
Open a new image, 600x250.
Add your tube as a new layer.
MuRa's Meister - Copies using the default Wallpaper (Rotate) setting.
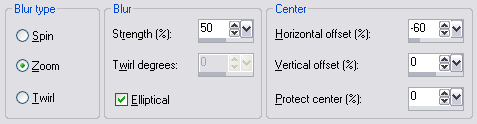
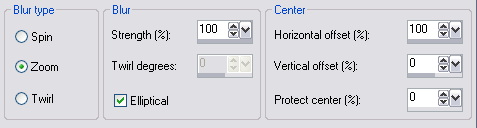
Adjust - Blur - Radial Blur using the following setting:
Duplicate this layer.
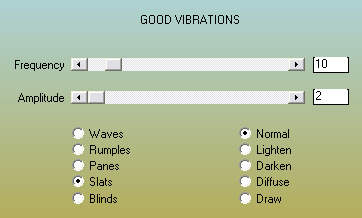
On the top layer, AAA Filters - Good Vibrations using the following setting:
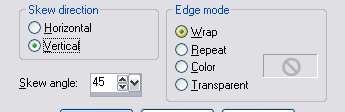
Effects - Geometric Effects - Skew using the following setting:
Change the Layer Setting on the top layer to Soft Light.
Change the opacity to 65.
Layers - Merge - Merge Visible.
Effects - Edge Effects - Enhance.
Duplicate this layer.
Effects - Distortion Effects - Pixelate with both boxes set to 15.
Effects - Edge Effects - Enhance.
Change the opacity of this layer to 40.
Add your masked tube as a new layer.
Move it into position and duplicate the tube.
On the bottom layer, Adjust - Blur - Radial Blur using the following setting:
Duplicate the blurred layer twice.
On each of the blurred layers, Greg's Factory Output, Vol. II - Pool Shadow
On the top layer, use the default setting
On the middle layer, change the Intensity to 158.
On the bottom layer, change the Intensity to 188.
Add all necessary copyright information.
For the name, I duplicated the name layer and repeated the last Radial Blur on the copy.
Then, I selected each letter on the top layer.
Selections - Modify - Contract by 2; DELETE.
Select None, then added a thin drop shadow (1, 1, 100, 10, black).
Add a 2pixel selection border.
Animate as usual.
For the avatar:
Make a copy of the image (Shift + D).
Delete any unnecessary layers.
Crop to 150x150.
Add your name or initial.
Here is another example, using the work of Ismael Rac:

|
|
|
|
« Last Edit: October 23, 2010, 01:04:25 pm by aremgy »
|
Report Spam
 Logged
|
|
|
|
|


|
|
|
|
|
|

