|
aremgy
|
 |
« on: July 02, 2010, 05:28:02 pm » |
|
Z O O O M
This tut was written on July 02, 2010.
It is written using PSPX; I'm sure the same effects are available in other versions.
SUPPLIES
An image or a tube, resized to 250x250.
I'm using the work of Keith Garvey. You need to purchase a license to use this work at MPT.
The following filters:
Xero - Fritallary
VM Stylize - Zoom Blur
Font of choice (I'm using "Eaglefeather Formal Light")
Let's begin!
Pick two colors from your tube, a lighter color for the foreground and a darker shade of the same color for your background.
Open a new image, 600x250.
Make a background gradient - Radial, Angle = 90, Repeats = 10.
Floodfill the image with the gradient.
Add a new layer.
Selection Tool - Custom Selection using the following setting:
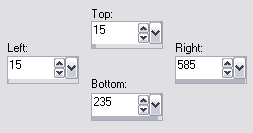
Floodfill the selection with the darker color.
Selections - Select None.
Xero - Fritallary using the default setting, but change the Variation to 10.
Effects - Edge Effects - Enhance.
Duplicate this layer twice.
On the top layer, VM Stylize - Zoom Blur using the default setting, but change the Amount to 38.
On the middle layer, VM Stylize - Zoom Blur using the default setting.
On the bottom layer, VM Stylize - Zoom Blur using the default setting, but change the Amount to 40.
Highlight the top layer and add a new layer.
Selection Tool - Custom Selection using the same setting as earlier.
Floodfill with the lighter color
Add your tube as a new layer, moving into position.
Selections - Invert.
Hit DELETE.
Selections - Select None.
Make sure you have the top layer highlighted, then Layers - Merge - Merge Down.
Adjust - Add/Remove Noise - Add Noise - Gaussian, 12, Monochrome checked.
Duplicate this layer.
On the top layer, repeat the Zoom Blur you used earlier.
Effects - Edge Effects - Enhance.
Selection tool - Custom Selection using the same settings.
Selections - Invert.
Hit DELETE.
Selections - Invert.
Selections - Modify - Select Selections Borders using Both Sides, 1, antialias unchecked.
Add a new layer, and fill the selection with the darker color.
Selections - Select None.
On this same layer, add a 2pixel selections border using the dark color.
(Selections - Select All; Selections - Modify - Select Selections Border using Inside, 2, antialias unchecked; fill with the dark color.)
Add your name and all necessary copyright information.
Animate as usual, change the Frame Properties to 30.
For the avatar:
Duplicate your tag (Shift + D.)
Crop to 150x150.
Remove all layers containing art.
Add your 2 pixel selections border.
Add your name (or initial.)
You may, if you wish, choose to animate your avatar.
Here is another example, using the work of Ismael Rac:


|
|
|
|
« Last Edit: August 09, 2010, 01:39:15 pm by aremgy »
|
Report Spam
 Logged
|
|
|
|
|


|
|
aremgy
|
|
« Reply #1 on: July 02, 2010, 05:33:58 pm » |
|
getting the tube layer to look right can be tricky, so play around with the layer settings and opacity...
i know you can do it!!
|
|
|
|
|
|
|
|
|
|

