|
aremgy
|
 |
« on: May 25, 2010, 07:48:08 am » |
|
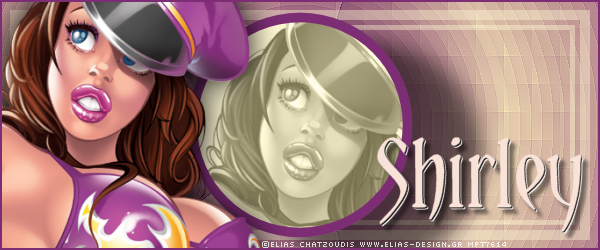
S E C T O R

This tut was written on May 25, 2010.
It is written using PSPX; I'm sure the same effects are available in other versions.
SUPPLIES
A tube and a closeup.
I'm using the work of Elias Chatzoudis. You need to purchase a license to use this work from MPT.
The following filters:
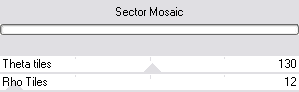
Pixelate - Sector Mosaic
Neology - Blend Mosaic
Font of choice (I'm using "Yataghan")
Let's begin!
Pick two colors from your tube.
A darker color for the foreground (a really dark color works best.)
A contrasting color (of a different shade) for the background.
Open a new image, 800x500.
Click in the foreground color in the Materials Box.
Make the following gradient:
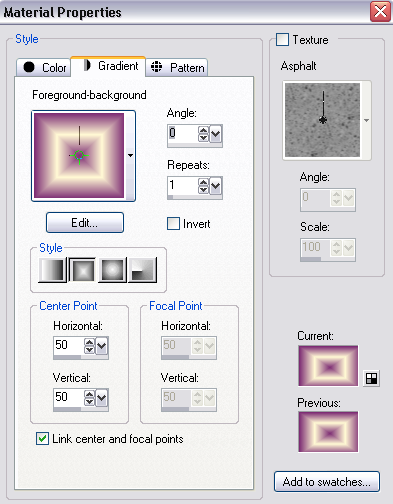
Floodfill your image with this gradient.
Pixelate - Sector Mosaic using the following setting:
Effects - Edge Effects - Enhance.
You may have to apply this twice, depending on your colors.
You want the Enhance effect to really show.
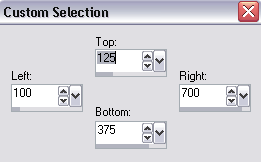
Selection Tool - Custom Selection using the following setting:
Crop Tool - Snap crop rectangle to: Current Selection
This is an icon on the Crop Toolbar, to the far right - it looks like this:
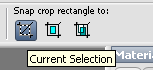
Click the green arrow to do the actual cropping.
Add a new layer.
Click in the foreground color in the Materials Box.
Make a gradient (Linear, 90, 1, invert checked) and floodfill the new layer.
Neology - Blend Mosiac using the default setting.
Effects - Edge Effects - Enhance.
Again, you may have to apply this twice.
Change the layer setting to Multiply.
Lower the opacity to 65.
(You may not have to lower the opacity, depending on your colors.)
Also, depending on your colors, it may not be necessary to use Multiply.
You may be able to simply lower the opacity.
Layers - Merge - Merge Visible.
Change the foreground color back to the color.
Change the background color to null.
Preset Shapes - Ellipse Tool (Circle), line width = 10.
Make sure "Create On Vector" is checked.
Draw out a circle of approx. 215 pixels.
You can check the size of your circle on the toolbar at the bottom of your workspace:

Objects - Align - Center in Canvas.
Layers - Conver to Raster Layer.
Using your magic wand, click in the middle of your circle.
Selections - Modify - Expand by 5.
Add a new layer below your circle.
Floodfill with your background color.
Keeping the selection, add the closeup of your tube as a new layer.
Move into position.
Selections - Invert.
DELETE
Selections - Select None.
Change the layer setting of your tube layer to Luminance (Legacy).
Change the opacity to approx. 55.
Hide the background layer.
Layers - Merge - Merge Visible.
Effects - 3D Effects - Drop Shadow using the Below wide right preset (30, 70, 50, 30, black.)
Unhide the background layer.
Add your tube as a new layer.
Move it to the top, if necessary.
(Layers - Arrange - Bring to top.)
Add a blurry drop shadow.
(I used 0, 0, 100, 50, black.)
Add a new layer above the background layer.
Selections - Select All.
Selections - Modify - Contract by 10.
Floodfill with the lighter color.
Selections - Modify - Contract by 10.
DELETE
Selections - Modify - Contract by 5.
Floodfill with the lighter color.
Selections - Modify - Contract by 5.
DELETE
Lower the opacity of this layer to 42.
Highlight your main tube layer.
Add a 2 pixel Selection Border using your dark color.
(Add a new layer.
Selections - Select All.
Selections - Modify - Select Selection Borders using Inside, 2, Anti-alias unchecked.
Fill with your dark color.)
Add your name and all necessary copyright information.
For the avatar:
Duplicate your tag (Shift + D.)
Remove any layers containing art.
Crop to 150x150.
Add your 2 pixel selections border.
Add your name (or initial.)
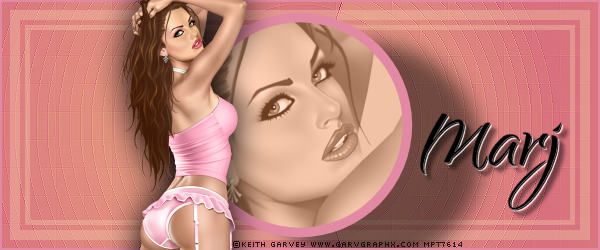
Here is another example, using the work of Keith Garvey:

|
|
|
|
« Last Edit: July 11, 2010, 09:46:37 pm by aremgy »
|
Report Spam
 Logged
|
|
|
|
|


|
Shirley
Newbie

Posts: 22

|
|
« Reply #1 on: May 25, 2010, 12:32:31 pm » |
|
This Tutorial looks great Rich! Thank you for making it for me, I LOVE it!!
|
|
|
|
huronna
Newbie
Posts: 15
|
|
« Reply #2 on: May 25, 2010, 04:49:56 pm » |
|
I have a question about the dimensions of the first custom selection. Since the tag is only 600 wide and 250 high...how do you do a selection of 700 375?? Going to continue and see what happens Well I love the results even though I didn't know what do do with that one section   |
|
|
|
« Last Edit: May 25, 2010, 06:04:35 pm by huronna »
|
Report Spam
Logged
|
|
|
|
|
aremgy
|
|
« Reply #3 on: May 25, 2010, 05:27:53 pm » |
|
oopsie  i've changed the dimension of the starting image to what was intended - 800x500. thanks for catching it, Miss Heidi |
|
|
|
|
Kansas
Newbie
Posts: 7
|
|
« Reply #4 on: May 31, 2010, 12:16:18 am » |
|
Made for my hot swap partner...great tut, Rich!   |
|
|
|
|
|
|
|
aremgy
|
|
« Reply #6 on: June 07, 2010, 09:24:48 am » |
|
lovely, SB!
thanks!!
|
|
|
|
|
|
|
|

