|
aremgy
|
 |
« on: May 20, 2010, 10:10:55 am » |
|
M A S K E D

This tut, my first tag tut, was written on April 20, 2010.
It is written using PSPX; I'm sure the same effects are available in other versions.
SUPPLIES
4 images (not tubes).
I'm using the work of Jennifer Janesko. You need to purchase a license to use this work from CILM.
Two masks that I assume you already have:
20/20 and Becky_Mask022
Font of choice (I'm using "Ministry")
Let's begin!
The images must be exactly 300x300.
Use the crop tool or resizing, if necessary.
If you are using faces, you want them facing in four different directions.
Use Image - Mirror, if necessary.
Open a new image, 600x600.
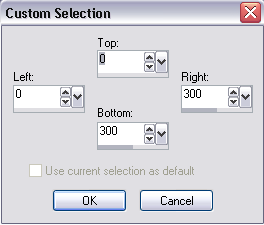
Selection tool - Custom Selection, using the following settings
Highlight the first image.
Edit - Copy.
On the tag, Edit - Paste Into Selection.
Select none.
Repeat for the other four images, using the following Custom Selections:
Upper Right - Top = 0; Left = 300; Right = 600; Bottom = 300.
Lower Left - Top = 300; Left = 0; Right = 300; Bottom = 600.
Lower Right - Top = 300; Left = 300; Right = 600; Bottom = 600.
You should have something like this:

(I realize there is an easier way to do this,
I felt this was an easy way for beginners to add images.)
Duplicate this layer.
Highlight the copy layer:
Image - Resize - 80%.
(Make sure that Resize all layers is NOT checked).
Hide the copy for now.
Highlight the original layer:
Adjust - Blur - Gaussian Blur - 30.
Image - Flip, then Mirror.
Layers - New Mask Layer - From Image.
Find the 20/20 Mask in the dropdown box, click OK.
Image - Merge - Merge Group.
Layers - New Mask Layer - From Image.
Find Becky_Mask022 in the dropdown box, click OK.
Image - Merge - Merge Group.
Unhide the copy layer and highlight it.
Adjust - Hue and Saturation - Colorize, set both boxes to 0, click OK.
Repeat both mask layers.
Set the opacity of this layer to 67.
Add a new raster layer, floodfill with white.
Repeat both mask layers.
Layers - Arrange - Send to Bottom.
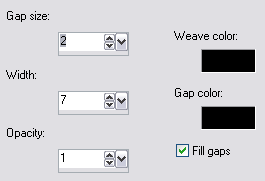
Effects - Texture Effects - Weave with the following settings:
Highlight the top layer, add a new raster layer.
Selection Tool - Custom Selection with the following setting:
Top = 0; Left = 299; Right = 301; Bottom = 600.
Floodfill with black.
(You may have to zoom in.)
Select none.
Duplicate this layer.
Image - Rotate - Right, 90 degrees.
Image - Merge - Merge Down.
Repeat the two mask layers.
Layers - Merge - Merge Visible.
The tag is done, you may wish to resize now.
(I've resized 80% in the sample.
Add your name, and any required copyright information (after resizing).
|
|
|
|
« Last Edit: May 20, 2010, 02:59:18 pm by aremgy »
|
Report Spam
 Logged
|
|
|
|
|


|
Ketta
Newbie

Posts: 4

|
|
« Reply #1 on: December 05, 2010, 03:13:30 pm » |
|
Very nice tut, Rich, I left a touch of color to show thru...  |
If I can't be a good example, I'll have to serve as a dire warning!  |
|
|
|
|
|

