|
aremgy
|
 |
« on: May 20, 2010, 09:58:26 am » |
|
S N A R E D


This tut was written on May 19, 2010.
It is written using PSPX; I'm sure the same effects are available in other versions.
SUPPLIES
A tube and an image.
I'm using the work of Jennifer Janesko. You need to purchase a license to use this work from CILM.
The following filters:
MuRa's Meister - Copies and Cloud
Font of choice (I'm using "Mr Lackboughs")
Let's begin!
Working from copies of both your tube and your image,
crop the tube to 200x200 and the image to 175x250.
Set both aside for now.
Pick two colors from your tube.
Open a new image, 250x250.
Floodfill with the following gradient:
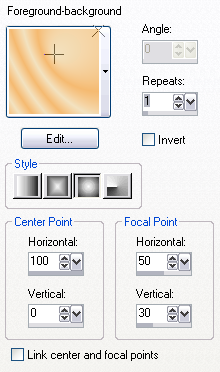
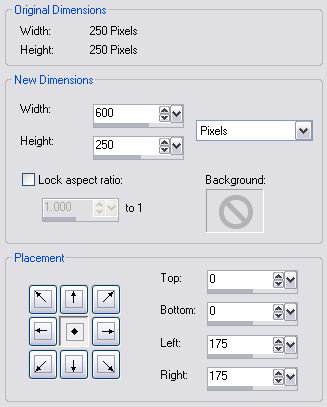
Image - Canvas Size using the following setting:
Mura's Meister - Copies using the following setting:

Effects - Edge Effects - Enhance.
Use your magic wand on the blank space to your right.
Add a new layer.
Highlight your image, then Edit - Copy; Edit - Paste Into Selection on the 600x250 tag.
Selections - Select None.
Image - Mirror.
Change the layer setting to Soft Light.
Set the tag aside for a bit.
Open a new image, 200x200.
Floodfill with the same gradient, then Image - Mirror.
Add your tube, and add a drop shadow (I used 0, 0, 100, 10, black.)
Highlight the bottom (gradient) layer.
Edit - Copy
Edit - Paste as New Layer on the 600x250 tag.
MuRa's Meister - Copies using the same setting, but change "Shift X" from -100 to 100.
Effects - Edge Effects - Enhance.
Add your tube (from the image you created earlier; Edit - Copy, Edit - Paste as New Layer.)
Highlight the upper of the two gradient layers.
Selections - Select All.
Selections - Float
Selections - Defloat
Selections - Modify - Select Selection Borders (Both Sides, 1, Anti-alias unchecked.)
Add a new layer, and fill with the darker of your two colors.
Bring this thin layer to the top (Layers - Arrange - Bring to Top.)
On this SAME layer:
Add a 2 pixel selection border (Selections - Select All; Selections - Modify - Select Selection Borders (Inside, 2, Anti-alias unchecked)).
Effects - 3D Effects - Drop Shadow (2, 2, 58, 3, black and -2, -2, 58, 3, black.)
Add a new layer.
MuRa's Meister - Cloud (you may need to Reset Colors.)
Adjust - Add/Remove Noise - Add Noise (Uniform, 90, Monochrome checked.)
Layers - Arrange - Send to Bottom.
Highlight the bottom of the two gradient layers.
Selections - Select All.
Selections - Float
Selections - Defloat
Selections - Modify - Select Selection Borders (Both Sides, 1, Anti-alias unchecked.)
On the SAME layer, fill with the darker of your two colors.
Selections - Select None.
Add the same drop shadow you used on your tube.
Add your name and all necessary copyright information.
Here is a nice way to add your copyright information:
Use Pixelette, size 6, Anti-alias OFF (on PSP X, I find that you need to use size 8.)
As a vector (so you can move it around easily) type your copyright information in white.
Layers - Convert to Raster Layer.
Selections - Select All.
Selections - Float
Selections - Defloat
Selections - Modify - Expand 1.
Add a new layer BELOW the white text.
On the new layer, floodfill the selection with black.
Selections - Select None.
Merge the two text layers together.
(This is a good way to add text when you want it to show over a crowded tube or image.)
For the avatar:
Duplicate your tag (Shift + D.)
Remove any layers containing art.
Crop to 150x150.
Add your 2 pixel selections border and drop shadow.
Add your name (or initial.)
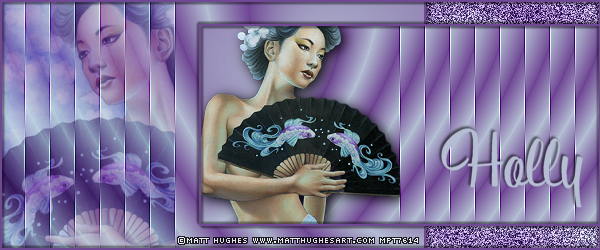
Here is another example, using the work of Matt Hughes:

|
|
|
|
|
|


|
Lithium Flower
Newbie

Posts: 10
The Norwegian PSP'er

|
|
« Reply #1 on: May 23, 2010, 02:50:52 pm » |
|
 Here is my try. I also put it up as an offer over at The Zone 
|
|
|
|
Shirley
Newbie
Posts: 22
|
|
« Reply #2 on: May 25, 2010, 12:29:04 pm » |
|
Here's my try Rich-hope you like it.   |
|
|
|
Nickel
Newbie
Posts: 12
|
|
« Reply #3 on: May 25, 2010, 04:44:34 pm » |
|
What a classy tut, thank you Rich. As usual i start with a tut and then my thoughts goes its own way *lol* Hope you can recognize your SNARED tut ... Here's my try ... i don't know which Name you prefere, so i did one with Rich, and one with Aremgy. Hope, you like it.     |
|
|
|
|
aremgy
|
|
« Reply #4 on: May 25, 2010, 05:31:47 pm » |
|
oh, my...
you have no idea what a thrill it is to see my basic tut transformed into this!
it's stunning!!
partially, the reason i started writing tuts was to show people that you can play with them.
bring an element from one tut to another....make a circle instead of a square....fiddle with the gradients...
thank you so much for sharing, hun...
|
|
|
|
|
|
|
|
aremgy
|
|
« Reply #6 on: June 02, 2010, 05:57:48 am » |
|
thanks, Miss Sherri....love it!
|
|
|
|
|
|
|
|
|
|

