M Y D R E A M S F L Y
You will need:
Font of your choice - I used one called Chloe.
Tube of your choice - I will be using the artwork of
Zindy License and Tubes available at
Zindy Zone ShopOne of Spawns Templates which you can get on his
Blog, we
will be using
Spawns Template 031 Filters:
Eye Candy 4000: HSB Noise
DSB Flux/Bright Noise
Ok let's beginOpen my Template ... Window> Duplicate ... Close Original ... Delete the Credits layer
Activate the
Left Inside Background layer ... Layers> Merge> Merge Down
Activate the
Left Inside Pattern layer ... Layers> Merge> Merge Down
Activate the
Left Outline layer ... Layers> Merge> Merge Down to Right Outline layer
Activate the
Left Background layer ... Layers> Merge> Merge Down to Right Background
So you should have in your
Layers:
Border
Angled Line
Right Outline
Right Background
Right Inside Pattern
Right Inside Background
Change your Foreground and Background to 2 colors from your Tube
Activate the
Right Inside Background layer
Selections> Select All ... Selections> Float ... Selections> Defloat ... Flood Fill the Selection with a color of your choice of the two you picked.
Selections> Select None ... Activate the
Right Inside Pattern layer
Adjust> Hue and Saturation> Hue/Saturation/Lightness ... Play around until your dots are a color you are happy with and click OK
Activate the
Right Background layer ... Change your Foreground to a Lighter shade or a color of your choosing.
Selections> Select All ... Selections> Float ... Selections> Defloat ... Layers> New Raster Layer ... Flood Fill the Selections with your Foreground color
Copy and paste your tube duplicate
Move each tube to the section and show what you are wanting to be seen in the Right Background and then the Left Background which we have joined at the beginning.
When happy with what is showing in Background layers, make sure you are on your tube layer > Invert> Delete> Select None.
Make sure you are on one your tube layers, then change the Blend Mode to your choice,on mine Left side was Luminance (Legacy) my Right side was Hard Light.
On the color portion of the Background Layer, Effects> Texture Effects> Texture....I used Canvas Fine you can pick any you like.
On the Right Outline Layer pick another color from your tube that is a contrasting color or a color of your choosing.
Selections> Select All ... Selections> Float ... Selections> Defloat ... Layers> New Raster Layer ... Flood Fill the Selections with your color of choice.
Flood Fill the Selections with a contrasting color (I used a medium blue)
Selections> Select None ... Rename this layer HSB NOISE ... Duplicate twice for a total of 3
Activate the first HSB noise layer
Effects> Eye Candy 4000: HSB Noise ... with the following settings
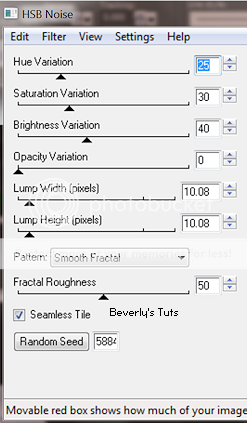
Click on the Random Seed button once then on OK
Activate the Copy of HSB Noise layer ... Edit> Repeat HSB Noise ... click on the Random Seed button once then OK
Activate the Copy (2) of HSB Noise layer ... Edit> Repeat HSB Noise ... click on the Random Seed button once then OK
Hide the 2 Top HSB Noise layers for now
Activate the Angled Line layer
Selections> Select All ... Selections> Float ... Selections> Defloat ... Layers> New Raster Layer ... Flood Fill the Selections with Color of your choice
Selections> Select None ... Adjust> Add/Remove Noise> Add Noise ... with the same settings as shown

Paste a copy of your tube and place it in the middle
Drop Shadow V-1, H-1, O-50, B-5 and Black
Add New Layer> Make sure it is at the top
Fill with Black>
Select All> Contract 3> Delete> Select None
Add Copyrights and your Name
ANIMATING
Edit> Copy Special> Copy Merged
Now open Animation Shop
Edit> Paste> As New Animation
Return to PSP hide the "HSB Noise" layer and unhide the "Copy of HSB Noise" layer
Edit> Copy Special> Copy Merged
Go back to Animation Shop
Edit> Paste> After Current Frame
Return to PSP hide the "Copy of HSB Noise" layer and unhide the "Copy (2) of HSB Noise" layer
Edit> Copy Special> Copy Merged
Go back to Animation Shop
Edit> Paste> After Current Frame
And that's it. All that's left is to save your Tag ... If you wish to Preview it first View> Animation
Tutorial written on the June 30, 2012
©Beverly Kelley

