|
aremgy
|
 |
« on: January 30, 2012, 03:11:54 pm » |
|
B O R D E R


This tut was written on January 30, 2012.
It is written using PSPX; I'm sure the same effects are available in other versions.
SUPPLIES
A tube and a closeup.
I'm using the work of Tim Lowery.
A license and tubes for this artist may be purchased from PTE.
These filters:
MuRa's Meister - Copies
DSB Flux - Bright Noise
You will also need two fonts: "Arial" and "Impact"; I assume these are already on your computer.
Font of choice, for your name (I used "Crawford").
Choose two colors from your tube; they may be contrasting colors if you wish.
This tut shows how to make a forum set tag/avatar using no scrapkits and no templates.
We will make the larger tag first, then the avatar and forum set tag.
Let's begin!
STEP ONE
Open a new image, 800 pixels wide by 800 pixels high.
Uncheck the Transparent box and set the background color to black.
Set your font to "Arial", make sure it is set to "Create as Vector"; size = 8
Use the lighter of your colors as the foreground and hide the background color for now.
Type a single period (".").
Objects - Align - Center in Canvas; Layers - Convert to Raster Layer.
STEP TWO
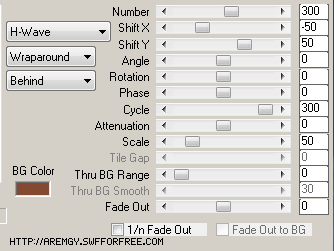
MuRa's Meister - Copies using the *Wave(horizontal) option and the following setting:
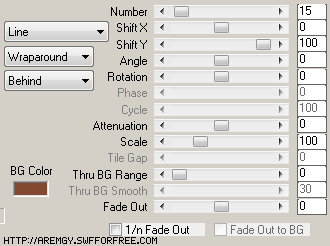
MuRa's Meister - Copies using the *Line option and the following setting:
STEP THREE
Selection Tool - Custom Selection using the following setting:
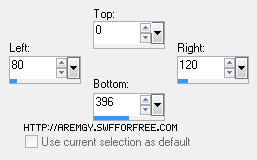
Image - Crop to Selection.
Image - Add Borders; check the Symmetric box; type a "2" in one of the boxes.
For the color, change to an obviously contrasting bright color, different from your chosen colors.
(If you right click in the color box, you will see several bright color options; choose one of those, if you wish).
Image - Canvas Size to 600x400, centered.
Repeat the MuRa's - Copies (using the *Line option) but:
Change the Shift X from 100 to 0 and change the Shift Y from 0 to 100.
STEP FOUR
Set your Magic Wand to Add(Shift); make sure the Tolerance is at 0.
Carefully click in the bright color that you used when adding the border.
DELETE.
Selections - Select None.
Duplicate this layer.
STEP FIVE
You will see that you have fifteen columns, each separated by a small blank space.
Using your Magic Wand (at the same settings), click in a black area of each column.
The Add(Shift) setting means that you don't have to hold a key down to select numerous areas.
When you have clicked in all fifteen columns, DELETE.
Selections - Select None.
STEP SIX
Duplicate this top layer, twice (for a total of three).
On each of these three layers, DSB Flux - Bright Noise using Intensity = 65, Direction = Mix.
Click on the radial button in front of Mix several times on each layer.
Highlight the top Flux layer.
Add a new layer; floodfill with the lightest of your colors.
Layers - Arrange - Send to Bottom.
STEP SEVEN
Add your closeup tube, moving into position; add a blurry drop shadow (I used 0, 20, 100, 20, black).
Add a new layer and a 2px selection border using your lighter color.
Add all name and all necessary copyright information.
STEP EIGHT
Now, we will make the word art.
Change your font to "Impact"; Create as Vector is checked.
Set your foreground color to white; set your background color to your darker (or contrasting color).
Hide the background color.
The size you will use for your word art will depend on what you write.
If you want the final size bigger (meaning 4-7ish letters), set the size to 120.
If you are going for a longer phrase, set the size to 72 (or smaller).
Type out your chosen phrase (I used "BARELY").
There are eight nodes on a vector - one in each corner, on in the middle of each side.
Use the nodes to stretch your word art into the desired shape.
When you are finished:
Selections - Select All
Selections - Float
Selections - Defloat
Add a new layer above the white layer; floodfill the selection on this new layer with your darker color.
Selections - Modify - Contract by 2; DELETE.
Selections - Select None.
On the top color word art layer, add Effects - 3D Effects - Drop Shadow of 1, 1, 100, 1, black.
Change the opacity of the white word art layer to 40.
Hide all layers except the two word art layers; then Layers - Merge - Merge Visible.
Now you can move your word art around, moving it into position.
Moving it below the tube is quite effective.
Unhide all the layers (except the bottom two Flux layers, for ease in animation).
STEP NINE
I'll show you how I animate tags...you can animate now, as normal, if you wish.
First, make sure all layers on your tag are unhidden (except for the two bottom Flux layers, already hidden).
Shift + CTRL + C at the same time (this is the same as Edit - Copy Merged).
Over in AS, CTRL + V (this, always, makes a copy of your last keystroke).
In this case, it will act as Edit - Paste - As New Animation.
Now, back in PSP, hide the Flux layer that is showing and unhide the middle one.
Shift + CTRL + C at the same time.
Back in AS, Shift + CTRL + L (this is the same as Edit - Paste - After Selected Frame).
Back in PSP, hide the Flux layer that is showing and unhide the bottom one.
Repeat the Shift + CTRL + C; then, in AS, repeat the Shift + CTRL + L.
The tag is now animated; save as a .gif file.
These keystrokes save a lot of time; the more you use them, the more they become second nature.
To make a forum set tag:
Duplicate the 600x400 tag, just in case. 
On the copy, crop to 600x250; you can try to keep the word art intact.
The tube will be replace, so don't worry about that.
Delete the border layer, the tube, the copyright; basically, everything above the three Flux layers.
Add your regular- sized tube and the blurry drop shadow (0, 20, 100, 20, black).
If you haven't kept the word art, highlight the word art layer on the larger tag and Edit - Copy;
Then, Edit - Paste - As A New Layer on the smaller tag.
Do the same with your name.
Add your 2px selection border and all necessary copyright information.
Animate as above, or as normal; save as a .gif file.
To make the avatar:
Duplicate the 600x250 tag.
Crop to 150x150.
Remove all unnecessary layers.
Add your 2px selection border, your name (or initial), and all necessary copyright information.
Save as a .png file.
Here is another example, using the work of PinUpToons:


|
|
|
|
« Last Edit: February 22, 2012, 10:54:18 am by aremgy »
|
Report Spam
 Logged
|
|
|
|
|


|
Lithium Flower
Newbie

Posts: 10
The Norwegian PSP'er

|
|
« Reply #1 on: January 30, 2012, 03:49:02 pm » |
|
Thank you so much Rich...I love it!
|
|
|
|
susy
Newbie
Posts: 21
|
|
« Reply #2 on: February 26, 2012, 10:13:27 am » |
|
Rich,
I'm having the hardest time with this tut.
I don't know whether it's a senior moment or what.
I start with a black 800x800, add the period, do both Mura copies effects but it doesn't work.
Am I suppose to be adding a layer in there somewhere.
I just end up with one single bordered column on the 800x800 no matter what I do.
Help?
I can usually figure these out but not this one.
It's not even hard to do...whaaaaa!
|
|
|
|
|
|
aremgy
|
|
« Reply #3 on: February 26, 2012, 10:53:00 am » |
|
Rich,
I'm having the hardest time with this tut.
I don't know whether it's a senior moment or what.
I start with a black 800x800, add the period, do both Mura copies effects but it doesn't work.
Am I suppose to be adding a layer in there somewhere.
I just end up with one single bordered column on the 800x800 no matter what I do.
Help?
I can usually figure these out but not this one.
It's not even hard to do...whaaaaa!
make sure that when you type the period, that you have your font set to "Create As Vector" that will put the dot on a separate layer from the black background. if that doesn't work for you, add a new layer first, then type the period... that should work... create as vector, then change to a raster layer...that will allow you to do the MuRa's properly  hope this helps.. |
|
|
|
|
susy
Newbie
Posts: 21
|
|
« Reply #4 on: February 26, 2012, 12:14:29 pm » |
|
OK, I did that but when I "image", add borders, I get a popup that says I have to merge to a single layer before I can add the borders.
So then I'm back to one layer again and the Mura copies won't work.
I must be missing something. LMBO
|
|
|
|
|
|
aremgy
|
|
« Reply #5 on: February 26, 2012, 12:33:07 pm » |
|
right, you want to have a single layer after you add the border, so that is right then, change the canvas size to 600x400.... you should have a single column surrounded by a lot of blank space..this is where you do the MuRa's to make several columns the only other thing i can thing of is....make sure you have a raster layer... after you have added the border, do Layers - Promote Background Layer... otherwise, i'm clueless...it's worked for me several times, it's worked for everyone... maybe someone else will have an idea |
|
|
|
|
susy
Newbie
Posts: 21
|
|
« Reply #6 on: February 26, 2012, 08:26:16 pm » |
|
I got it, Rich.
Don't know what was going on but I shut down PSP right after I made the crop selection and filed it.
When I came right back and tried the MuraMeister line, it worked right away.
My PSP must have been tired an overloaded.
I didn't think I was that slow. LMBO
Thanks so much for your help and for this beautiful tut.
I was determined to do it.
|
|
|
|
|
Holly1928
Newbie
Posts: 2
|
|
« Reply #7 on: February 26, 2012, 10:22:37 pm » |
|
I had the same problem and I opened a new transparent image 600x400 and then copied and pasted the original after adding the border. Then proceeded from there. My animation is kind of sparse though but that has nothing to do with this.
Holly
|
|
|
|
|
susy
Newbie
Posts: 21
|
|
« Reply #8 on: February 27, 2012, 11:03:09 am » |
|
I worked it out. I stopped and filed the selection, closed PSP, reopened it changed the canvas size and continued from there and the Mura copies worked. I should have known better cause it's happened to me before, especially when I work at PSP for hours.  I guess I just wore it out.  |
|
|
|
|
gagejennifer
Newbie
Posts: 15
|
|
« Reply #9 on: September 04, 2014, 08:58:54 pm » |
|
I'm having quite a few problems with this tut and I cannot figure out what it is I'm doing wrong. In step 2 when it says to do the "Add borders" part, I can't seem to make it the contrasting color for some reason. Not only that in step 5, I don't have the 15 columns it says I'm supposed to have. What did I do wrong and is there a way to fix it ?.
I also noticed when I do the tut in PSP 9, in the very first step when it tells you to type out the dot, and center it and convert it to a raster layer, I can't even see it. Sometimes it makes me wonder if there's a way to reset 9 to default in the same way you can version 7. (Is there ?. lol) I just don't know. lol.
|
|
|
|
|
|
|
|

