|
aremgy
|
 |
« on: May 20, 2010, 09:54:58 am » |
|
S P O T L I G H T

This tut was written on May 14, 2010.
It is written using PSPX; I'm sure the same effects are available in other versions.
SUPPLIES
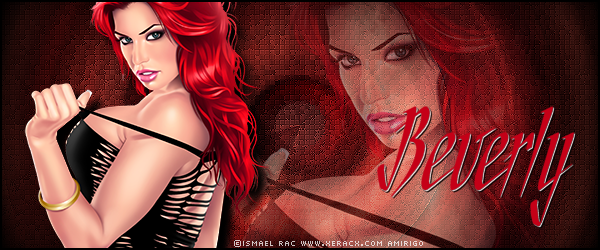
Two tubes, one preferably a close-up or a larger size tube.
I'm using the work of Ismael Rac. You need to purchase a license to use this work from AMI.
The following filters:
Mura's Meister - Copies
Filter Factory U - Bulging Edge Shader
Filter Factory U - Flip Chop Radial
Greg's Factory Output Vol. II - Pool Shadow
Xero - Fritallary
Two masks:
20/20 and Becky Mask 022
Font of choice (I'm using "Needlescript")
Let's begin!
Duplicate your close-up tube (Shift + D).
Use both masks on the duplicated tube; first the 20/20 mask, then the Becky mask.
Set aside for now.
Open a new image, 600x250.
Cut/paste your tube.
Mura's Meister - Copies - Wallpaper (rotate) using the default setting.
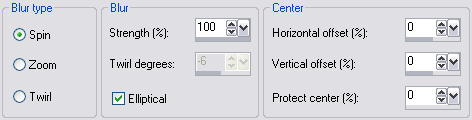
Adjust - Blur - Radial Blur using the following setting:
Crop to 600x250 (to get rid of excess outside the layer).
(Note - You may wish to add a layer under the Radial Blur layer filled with a color from your tube.
Change the layer setting of the Radial Blur layer to Luminance (Legacy) in this case.)
Duplicate this layer twice (for a total of three layers).
Hide the top and bottom layer, and highlight the middle layer.
Adjust - Add/Remove Noise - Add Noise - Uniform, 12, Monochrome checked.
Greg's Factory Output Vol. II - Pool Shadow using the default setting but change Intensity to 50.
Xero - Fritallary using the default setting.
Effects - Edge Effects - Enhance.
Hide this layer, and unhide the bottom layer.
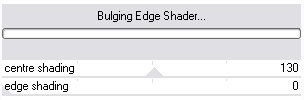
Working on the bottom layer, Filter Factory U - Bulging Edge Shader using the following setting:
Hide this layer, and unhide the top layer.
Working on the top layer, Filter Factory U - Flip Chop Radial using the default setting.
Effects - Edge Effects - Enhance.
Unhide all three layers, and change the layers settings as follows:
Bottom Layer - Normal
Middle Layer - Multiply
Top Layer - Overlay
Add your masked close-up tube you made earlier.
Move it to the right side, so it blends with the black background.
Lower the opacity of this layer to 55.
Add your tube, positioning where you think is best.
Add a drop shadow (I used 10, 10, 100, 10, black).
Add a 2 pixel selection border.
(Selections, Select All.
Selections, Modify, Select Selection Borders - Inside, 2, anti-alias checked.
Fill with black.)
Add your name and all necessary copyright information.
For the avatar:
Duplicate your tag in PSP.
Remove the tube layers.
Crop to 150x150.
Add your 2 pixel selections border.
Add your name (or initial.)
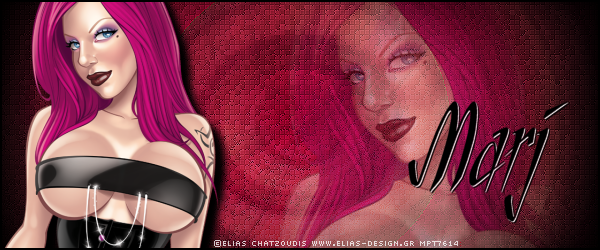
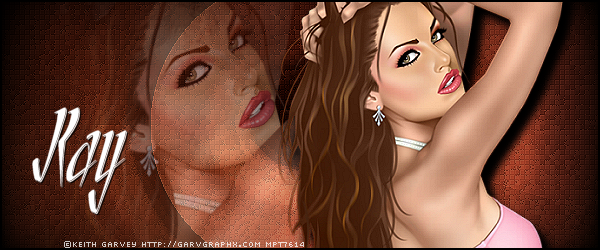
Here are other examples, using the work of Elias Chatzoudis and Keith Garvey:
|
|
|
|
« Last Edit: November 16, 2010, 09:49:02 am by aremgy »
|
Report Spam
 Logged
|
|
|
|
|


|
ToilGirl_Beverly
Administrator
Newbie

Posts: 28
Make someone's day - make them a forum set!

|
|
« Reply #1 on: June 02, 2010, 12:48:04 am » |
|
Your link for the masks - goes to a spot at the Zone that I am not allowed to go to.
Just thought I would let you know.
Hugs,
Beverly
|
Thank you aremgy, for being able to post my tuts here!
(((((((Thanks to all who make me new clothes))))))) |
|
|
|
aremgy
|
|
« Reply #2 on: June 02, 2010, 05:50:32 am » |
|
lol...that's because the tuts have been deleted  i'll fix it... |
|
|
|
|
|
|
|

