|
aremgy
|
 |
« on: January 25, 2012, 03:57:27 pm » |
|
V E G A S, T O O

This tut was written on January 25, 2012.
It is written using PSPX; I'm sure the same effects are available in other versions.
SUPPLIES
A tube.
I'm using the work of Jose Cano.
A license and tubes for this artist may be purchased from PTE.
The following filters:
MuRa's Meister - Copies
You'll need the font, "Impact".
Likely, it is already on your computer.
The cursive font I used is "Valentina".
You will also need this animation by Motz Graphics (site currently down).
If you already have the Motz animations, it is in the Mixed folder. It's called "animado_dorado-06"
Otherwise, simply save this animation by right clicking on it and save to your computer.

Choose a color from your tube.
Any color but black will be fine.
This tut shows how to make a tag using no scrapkits and no templates.
I will give the instructions to make everything.
SPECIAL INSTRUCTIONS FOR MAKING A FORUM SET TAG WILL BE IN RED.
Let's begin with the animation.
Open the Motz animation in AS.
Edit - Select All.
Edit - Copy.
In PSP, Edit - Paste As New Image.
Each frame of the Motz animation will be on a separate layer, all named "Frame 1".
Image - Canvas Size to 600 wide by 400 high, centered.
Starting from the bottom, ON EACH LAYER, MuRa's Meister - Copies using the Tiling preset, changing the number from 1 to 2.
When you are finished, save this as a .pspimage (PSP7 compatible)..
Otherwise, it will not open in AS.
If you get a message about changing the image in AS, click "No".
In AS, close the Motz animation.
Open the saved MuRa's .pspimage in AS.
Edit - Select All.
Effects - Apply Image Effects using the Fade to Grey effect.
Animation - Reverse Frames.
Repeat the Fade To Grey effect.
Click in the first frame.
Edit - Copy.
Back in PSP, right click on your workspace.
Paste As New Image.
Add a new layer, floodfill with black.
Edit - Copy.
Back in AS, right click on your workspace.
Paste As New Animation.
You'll need eight frames of this black rectangle.
Either Edit - Duplicate Selected until you have eight frames OR Shift + CTRL + L seven times until you get eight frames.
On both images, Edit - Select All.
There is a button on the top toolbar called "Propogate Paste" (it's the ninth button from the right on the default workspace).
It looks like three diagonal sheets of paper.
Make sure this button is pushed in, it allows you to merge two images together without using the Edit command.
Take your mouse and left click in the first frame Motz animation you created.
Hold the mouse button down.
Carefully drag the mouse down to the first frame of the image with the black rectangles.
Do NOT let go of the mouse button until the frame is properly placed.
If you are having trouble, I've brought a screenshot from another of my tuts that will give you some idea:
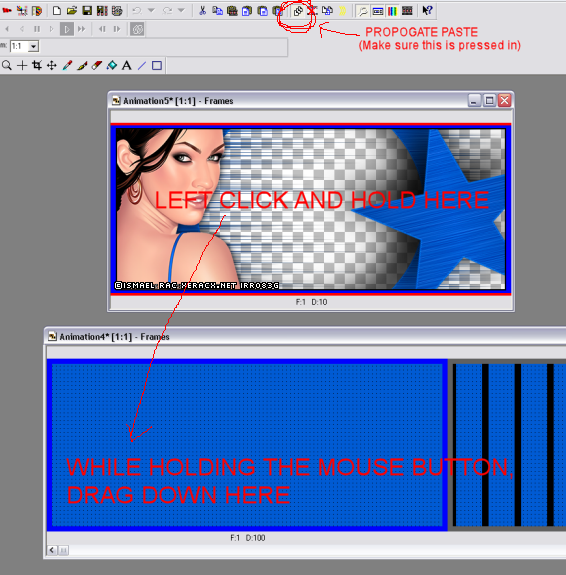
Remember, you want to add the Motz animation ON TOP of the black rectangle.
If you plan on making this tutorial again, I would suggest saving this animation now to your computer.
If you are going to make a forum set tag, Shift + D to make a duplicate of this animation.
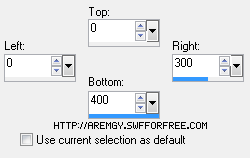
Click on the Crop tool, located just above the default workspace (to the left side).
An Options button will show up, click on that.
Change the numbers in the Right box to 600 and the Bottom box to 250.
Click OK, then click on the Crop button (next to the Options button).
If you plan on making this tutorial again, I would suggest saving this animation now to your computer.
Highlight the 600x400 animation.
Right click in the first frame; click Copy.
In PSP, right click on your workspace; click Paste As New Image.
Add a new layer, floodfill with black.
Effects - Texture Effects - Weave using 1, 3, 1, both boxes set to your chosen color, Fill Gaps checked.
Effects - Distortion Effects - Wind set to From Left, Wind Speed = 100.
Repeat the Wind effect using From Right.
Effects - Edge Effects - Enhance.
Duplicate this layer.
Image - Free Rotate using Left, 45 degrees, neither box checked.
Effects - Image Effects - Offset using the following setting:

If you are making a forum set tag, omit the Offset effect.
Change the opacity of this layer to 50.
Hide the bottom layer.
Layers - Merge - Merge Visible.
Selection Tool - Custom Selection using the following setting:
If you are making a forum set tag, the bottom number will automatically set to 250.
DELETE.
Duplicate this layer, then Image - Mirror.
Layers - Merge - Merge Visible.
If you are making a forum set avatar, Shift + D NOW to make a duplicate of your image.
Set the duplicate aside for now.
Back to the 600x400 image.
Image - Rotate Left (not Free Rotate).
Set your font to Impact, size 780.
Your background color should be your chosen color, your foreground should be hidden.
Type a double small-case "L" ("ll").
For a forum size tag, only type one small-case "L".
Objects - Align - Center in Canvas.
Layers - Convert to Raster Layer.
Image - Rotate Right (not Free Rotate).
Using your Magic Wand, click in both of the colored stripes.
For a forum set tag, click in the single stripe.
Selections - Contract by 10.
DELETE.
Highlight the merged layer.
DELETE.
Selections - Select None.
Highlight the top layer.
Adjust - Add/Remove Noise - Add Noise using Uniform, 45, Monochrome checked.
If you are adding word art, now is the time for that.
I simply used my script font, "Valentina" (size 48) and typed out several instance of "rocker chick".
Then, Object - Align - Center in Canvas.
This put the word art direct along the wider strip between the two stripes.
I added a small drop shadow to the word art (2, 2, 58, 3, black).
For a forum set tag, you will have to decide where the word art fits best.
It will fit either at the top or the bottom of the empty space.
Add your tube, moving into position.
Add a blurry drop shadow (I used Eye Candy 5 - Perspective Shadow with the Blurry preset).
Add a 2px selection border using your chosen color.
Add your name and all necessary copyright information.
We have to add this part to the animation we made in AS.
To do that, Edit - Copy Merged.
In AS, Edit - Paste as New Animation.
We will add this to the already completed animation in the same way.
Shift + CTRL + L seven times to make eight frames.
Edit - Select All.
Finish up the same way that you added the Motz animation image to the black animation image.
Your tag is finished.
Save as a .gif file.
For a forum set tag, you will add your completed tag (with the tube, name, and necessary copyright information)
to the 600x250 cropped animation you made in AS.
For the avatar:
Working with the duplicate image you set aside earlier, crop to 150x150.
Set your font to Impact, size 300.
Your background color should be your chosen color, your foreground should be hidden.
Type a single small-case "L" ("l").
Using your Magic Wand, click in the single stripe.
Selections - Contract by 10.
DELETE.
Highlight the merged layer.
DELETE.
Selections - Select None.
Highlight the top layer.
Adjust - Add/Remove Noise - Add Noise using Uniform, 45, Monochrome checked.
Unhide the bottom layer (which should be a copy of a frame from the Motz animation layer you created).
Add your name (or initial).
Add a 2px selection border using your chosen color.
Here is another example, using a free image by Alehandra Vanhek:


|

