|
aremgy
|
 |
« on: January 14, 2012, 05:41:28 pm » |
|
D I V E R S E

This tut was written on January 14, 2012.
It is written using PSPX; I'm sure the same effects are available in other versions.
SUPPLIES
A tube.
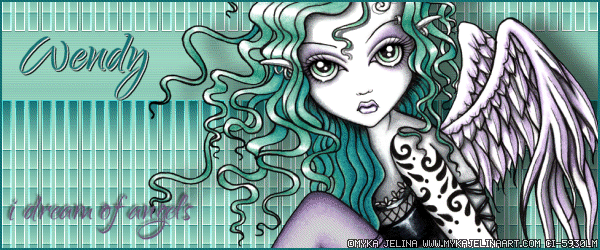
I'm using the work of Myka Jelina, formerly of CILM.
A license and tubes by this artist can be found at her site HERE.
The following filters:
MuRa's Meister - Copies
Neology - Tiler
Font of choice (I'm using "Qwigley")
Pick a dark shade from your tube for your background color, and a much lighter shade of the same color as your foreground.
Make a foreground gradient - Angle=0, Repeats=0.
You want the darker color on top.
A different version of this tag is shown at the bottom of this tut.
You can make this 2d version by changing one of the settings in your 2d MuRa's step.
Open a new image, 10 x 50 high.
Floodfill with your gradient.
Selections - Select None.
Image - Canvas Size to 600x250, centered.
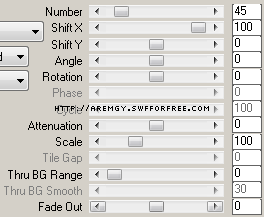
MuRa's Meister - Copies, Line preset using the following setting:

(If you are making both variations, duplicate this layer now for later use.)
MuRa's Meister - Copies, Line preset using the following setting:
Effects - Edge Effects - Enhance.
Add a new layer.
Floodfill with your gradient.
Image - Flip.
(So the lighter color is on the top.)
Duplicate this layer twice, for a total of three.
Neology - Tiler using the default settings (40, 30, 0, 0).
Repeat on the other two gradient layers; changing the Tile height first to 40, then to 50.
On each gradient layer, Effect - Edge Effects - Enhance 2x.
Highlight the bottom layer.
Layers - Arrange - Bring to Top.
Add your tube as a new layer.
Add a blurry drop shadow (I used Eye Candy 5: Impact - Perspective Shadow using the Blurry preset.)
Add a 2px Selection border with the same color you used earlier.
Add your name and all necessary copyright information.
To animate:
Edit - Copy Merged.
In AS, Paste as New Animation.
Back in PSP, hide the top Tiler layer.
Edit - Copy Merged.
In AS, Paste After Current Frame.
Back in PSP, hide the middle Tiler layer.
Edit - Copy Merged.
In AS, Paste After Current Frame.
Change the Frame Properties to 45.
For the avatar:
Duplicate your tag (Shift + D.)
Remove your tube layer.
Crop to 150x150.
Add a new layer.
Add a 2px Selection border, using your dark color.
Add your name (or initial) and all necessary copyright information.
Here is a variation, also using the work of Myka Jelina.
You can make this by changing the Shift Y setting on the 2d MuRa's step from 0 to 60.

|
|
|
|
« Last Edit: January 14, 2012, 07:53:33 pm by aremgy »
|
Report Spam
 Logged
|
|
|
|
|


|
|
|
|
aremgy
|
|
« Reply #2 on: January 25, 2012, 07:12:17 pm » |
|
gorgeous...
thanks, SB!!
huggs
R
|
|
|
|
|
|
|
|

