|
aremgy
|
 |
« on: May 14, 2011, 02:38:43 pm » |
|
P A I N T I N G


This tut was written on May 14, 2011.
It is written using PSPX; I'm sure the same effects are available in other versions.
SUPPLIES
A tube, preferably one with many colors.
I'm using the work of Ken Morton.
You must purchase a license to use this work at CDO.
The following filters:
Greg's Factory Output, Vol. II - Pool Shadow
VM Stylize - Zoom Blur
MuRa's Meister - Copies
Font of choice (I'm using "SP Spence")
Let's begin!
You will need at least four colors (preferably from your tube.)
Pick two now - one for the foreground and one for the background.
Open a new image, 600 wide x 250 high.
Floodfill using one of your colors.
Greg's Factory Output, Vol. II - Pool Shadow using the default setting, but change the Intensity to 50.
Adjust - Add/Remove Noise - Add Noise using Uniform, 12, Monochrome checked.
Set this aside for a bit.
Open a new image, 100x100
Set your paintbrush tool to Hardness = 100.
You will be using it four times.
Paintbrush setting to Round, size 75.
Right click on your canvas.
This will make a large circle using your background color.
Add a new layer.
Change the paintbrush setting to Round, size 50.
Left click on your canvas.
This will make a smaller circle using your foreground color.
Change both of your colors to two different colors from your tube.
Add a new layer.
Change the paintbrush setting to Square, size 50.
Right click on your canvas.
Add a new layer.
Change the paintbrush setting to Square, size 25.
Left click on your canvas.
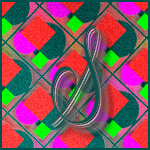
You will have something like this:

Edit - Copy Merged.
Switch to the larger image you made earlier.
Edit - Paste as new layer.
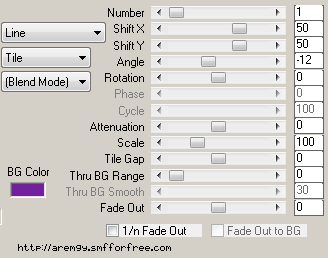
Working on the larger image, MuRa's Meister - Copies using the following setting:
VM Stylize - Zoom Blur using the default setting.
Repeat the noise you used earlier.
You may have to lower the opacity of this layer (maybe to 80ish.)
Set aside again.
Move back to the smaller image.
On each layer, Effects - 3d Effects - Drop Shadow using 0, 5, 50, 5, black.
Add a new layer.
Selections - Select All.
Selections - Modify - Select Selection Borders using Both Sides, 2, anti-alias unchecked.
Flood fill the selection with one of your colors.
Image - Resize to 50%
Edit - Copy Merged.
Move to the larger image.
Edit - Paste as new layer.
Repeat the MuRa's you used earlier.
Add your tube, and a blurry drop shadow (I used Eye Candy 5: Impact - Perspective Shadow using the Blurry preset.)
Add a 2px Selection border with the same color you used earlier.
Add your name and all necessary copyright information.
For the avatar:
Duplicate your tag (Shift + D.)
Remove the layer with the tube.
Crop to 150x150.
Add a new layer.
Add a 2px Selection border, using your dark color.
Add your name (or initial) and all necessary copyright information.
Here is another example, using the work of Zlata_M:

|
|
|
|
« Last Edit: January 10, 2012, 06:00:41 pm by aremgy »
|
Report Spam
 Logged
|
|
|
|
|


|
susy
Newbie

Posts: 21

|
|
« Reply #1 on: May 15, 2011, 11:35:02 pm » |
|
LOL I didn't know that you had used my set that you made for me for this tut until I came to look for a tut to use.
I love it and I sure love the colors!
Thanks Rich!!!
|
|
|
|
|
Sezy
Newbie
Posts: 4
|
|
« Reply #2 on: June 12, 2011, 08:56:11 pm » |
|
I've just found this - thank you so much Rich  |
|
|
|
|
gagejennifer
Newbie
Posts: 15
|
|
« Reply #3 on: January 15, 2012, 02:35:49 pm » |
|
I wanted to try this tutorial. But I can't get the VM Stylize Zoom blur plugin to load right. No matter what I do it will not show up in my Plugins list in versions 7 8 or 9. Is ther an alternative plugin I can use that will work and give the same effect as that one ?. Thanks.
|
|
|
|
|
|
aremgy
|
|
« Reply #4 on: January 15, 2012, 04:19:33 pm » |
|
Check your other VM plugins...it might not be in Stylize. I find that VM filters are kinda funny about where they may/may not be  If you don't have it, try Blur - Motion Blur - Angle=45, Strength=100...that will give a nice effect. |
|
|
|
|
gagejennifer
Newbie
Posts: 15
|
|
« Reply #5 on: January 15, 2012, 05:01:50 pm » |
|
Ok I will try that. I liked the way this tut looked. So I wanted to try that.
|
|
|
|
|
ToilGirl_Beverly
Administrator
Newbie

Posts: 28
Make someone's day - make them a forum set!
|
|
« Reply #6 on: January 16, 2012, 10:53:01 am » |
|
I wanted to try this tutorial. But I can't get the VM Stylize Zoom blur plugin to load right. No matter what I do it will not show up in my Plugins list in versions 7 8 or 9. Is ther an alternative plugin I can use that will work and give the same effect as that one ?. Thanks.
The only way I have this plug-in is with my Filters Unlimited 2 - hope this helps |
Thank you aremgy, for being able to post my tuts here!
(((((((Thanks to all who make me new clothes))))))) |
|
|
|
|
|

