

|
| April 19, 2024, 06:07:51 pm | ||||
|
||||
| News: Welcome to SMF For Free |
| Home | Help | Search | Staff List | Login | Register |
|
11
on: July 21, 2012, 01:43:12 pm
|
||
| Started by aremgy - Last post by Vesta | ||
|
Ooh, this one looks awesome!
|
||
|
12
on: July 07, 2012, 06:48:02 pm
|
||
| Started by ToilGirl_Beverly - Last post by ToilGirl_Beverly | ||
|
S P I K Y H A L O  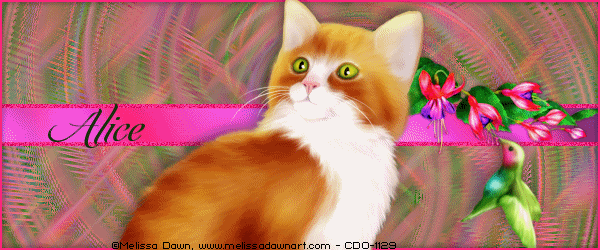 You will need: Font of your choice - I used one called Kozmetica Script Tube of your choice - I will be using the artwork of Melissa Dawn License and Tubes available at Creative Design Outlet You can find this tube HERE and I used graphics that came with the tube. Filters: DSB Flux/ Bright Noise Eye Candy 4000 Fun House/Gyro Graphics Plus/Cross Shadow MuRa's Meister/Copies Ok let's begin Change your Foreground and your Background to two colors from your Tube Change your Foreground to Gradient ... with the following settings  Open a New Image 600x250 ... I used the flowers from the tube and pasted them as new image. Duplicate and close one off to use later. Effects > MuRa's Meister > Copies > Wallpaper Rotate > Increase amount till the background is covered since I only used the flowers I increased to 40. Adjust> Blur> Motion Blur with the settings at 45 Angle at 100% Then Image> Flip and Image > Mirror redo the Motion Blur Continue to do this Motion Blur > Flip > Mirror for about 6 times. Duplicate go to the top layer Effects > Distortion Effects > Spiky Halo ... with the following settings 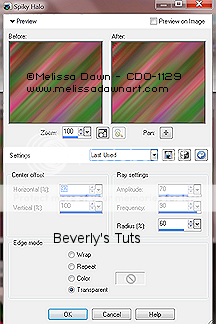 Mirror > Apply the Spiky Halo Effect again Change the Blend Mode of this layer to Light or one that works for you. Adjust > Sharpness > Unsharp Mask at these settings 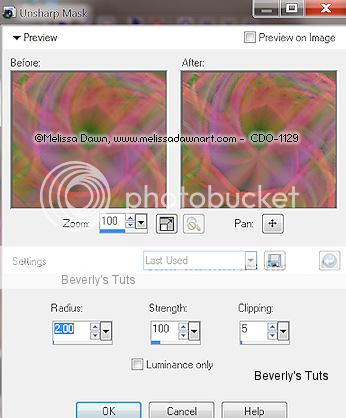 Merge Visible > Duplicate Effects> Fun House > Gyro at these settings  Change the Blend Mode of this layer to Light or one that works for you. Merge down you should have your background and flowers or accent piece at this point Now have your gradient in your background section > the foreground is Transparent Open your Rectangular Tool > Draw a Ribbon horizontal across your tag. While still in VECTOR Layer > Objects > Align > Center of Canvas > Raster Layer Effects > Graphics Plus > Cross Shadow at Default settings Selections > Select All > Float Selections > Select All > Defloat > Selections > Modify > Select Selection Borders at the following settings 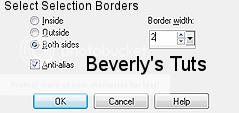 New Layer > Fill with an accent color Rename Border Duplicate this layer twice (for a total of 3) ... Effects> DSB Flux> Bright Noise ... with the setting of 38 Activate the Copy of Border layer ... Edit> Repeat Bright Noise ... click on the Mix button once then OK Activate the Copy (2) of Border layer ... Edit> Repeat Bright Noise ... click on the Mix button once then OK Selections> Select None ... Hide the 2 Top Border Layers for now If you are using an accent piece, like a flower etc and wish to have the same animation as my display continue on But if not skip this section that is in Red. Make two more copies of the flowers or your accent piece, and name them Accents. For a total of three layers of Accents Accent Layer > Effects > Eye Candy 4000 > HSB Noise at the following settings 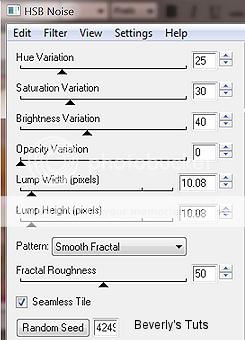 Activate the Copy of Accent layer ... Edit> Repeat HSB Noise ... click on the Random Seed button once then OK Activate the Copy (2) of Accent layer ... Edit> Repeat HSB Noise ... click on the Random Seed button once then OK Hide the 2 Top Accent Layers for now With the Top layer active Paste your Tube as a New Layer, position where you like resize if necessary Apply a suitable Drop Shadow New Layer > fill with the same color as the Border layer... Select All > Select > Contract by 2 > Drop Shadow 0, 0, 100, 10 Black Tutorial written on the July 7, 2012 ©Beverly Kelley |
||
|
13
on: June 30, 2012, 09:46:24 pm
|
||
| Started by ToilGirl_Beverly - Last post by ToilGirl_Beverly | ||
|
M Y D R E A M S F L Y   You will need: Font of your choice - I used one called Chloe. Tube of your choice - I will be using the artwork of Zindy License and Tubes available at Zindy Zone Shop One of Spawns Templates which you can get on his Blog, we will be using Spawns Template 031 Filters: Eye Candy 4000: HSB Noise DSB Flux/Bright Noise Ok let's begin Open my Template ... Window> Duplicate ... Close Original ... Delete the Credits layer Activate the Left Inside Background layer ... Layers> Merge> Merge Down Activate the Left Inside Pattern layer ... Layers> Merge> Merge Down Activate the Left Outline layer ... Layers> Merge> Merge Down to Right Outline layer Activate the Left Background layer ... Layers> Merge> Merge Down to Right Background So you should have in your Layers: Border Angled Line Right Outline Right Background Right Inside Pattern Right Inside Background Change your Foreground and Background to 2 colors from your Tube Activate the Right Inside Background layer Selections> Select All ... Selections> Float ... Selections> Defloat ... Flood Fill the Selection with a color of your choice of the two you picked. Selections> Select None ... Activate the Right Inside Pattern layer Adjust> Hue and Saturation> Hue/Saturation/Lightness ... Play around until your dots are a color you are happy with and click OK Activate the Right Background layer ... Change your Foreground to a Lighter shade or a color of your choosing. Selections> Select All ... Selections> Float ... Selections> Defloat ... Layers> New Raster Layer ... Flood Fill the Selections with your Foreground color Copy and paste your tube duplicate Move each tube to the section and show what you are wanting to be seen in the Right Background and then the Left Background which we have joined at the beginning. When happy with what is showing in Background layers, make sure you are on your tube layer > Invert> Delete> Select None. Make sure you are on one your tube layers, then change the Blend Mode to your choice,on mine Left side was Luminance (Legacy) my Right side was Hard Light. On the color portion of the Background Layer, Effects> Texture Effects> Texture....I used Canvas Fine you can pick any you like. On the Right Outline Layer pick another color from your tube that is a contrasting color or a color of your choosing. Selections> Select All ... Selections> Float ... Selections> Defloat ... Layers> New Raster Layer ... Flood Fill the Selections with your color of choice. Flood Fill the Selections with a contrasting color (I used a medium blue) Selections> Select None ... Rename this layer HSB NOISE ... Duplicate twice for a total of 3 Activate the first HSB noise layer Effects> Eye Candy 4000: HSB Noise ... with the following settings 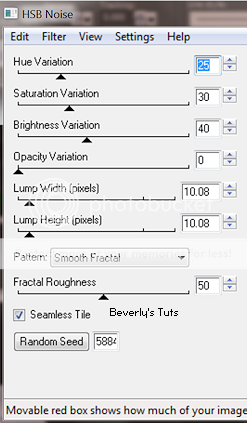 Click on the Random Seed button once then on OK Activate the Copy of HSB Noise layer ... Edit> Repeat HSB Noise ... click on the Random Seed button once then OK Activate the Copy (2) of HSB Noise layer ... Edit> Repeat HSB Noise ... click on the Random Seed button once then OK Hide the 2 Top HSB Noise layers for now Activate the Angled Line layer Selections> Select All ... Selections> Float ... Selections> Defloat ... Layers> New Raster Layer ... Flood Fill the Selections with Color of your choice Selections> Select None ... Adjust> Add/Remove Noise> Add Noise ... with the same settings as shown  Paste a copy of your tube and place it in the middle Drop Shadow V-1, H-1, O-50, B-5 and Black Add New Layer> Make sure it is at the top Fill with Black> Select All> Contract 3> Delete> Select None Add Copyrights and your Name ANIMATING Edit> Copy Special> Copy Merged Now open Animation Shop Edit> Paste> As New Animation Return to PSP hide the "HSB Noise" layer and unhide the "Copy of HSB Noise" layer Edit> Copy Special> Copy Merged Go back to Animation Shop Edit> Paste> After Current Frame Return to PSP hide the "Copy of HSB Noise" layer and unhide the "Copy (2) of HSB Noise" layer Edit> Copy Special> Copy Merged Go back to Animation Shop Edit> Paste> After Current Frame And that's it. All that's left is to save your Tag ... If you wish to Preview it first View> Animation Tutorial written on the June 30, 2012 ©Beverly Kelley |
||
|
14
on: June 02, 2012, 06:16:47 pm
|
||
| Started by Falak - Last post by Falak | ||
|
Hello..
I'm Falak I love so much grapichs designs, so I hope to leran so much and share too.. Thanks very much for let me be part of this group.. Big hug..  |
||
|
15
on: May 09, 2012, 09:34:45 am
|
||
| Started by bj - Last post by bj | ||
|
thankyou for letting me join the group and admire all the talent here. i have a quick question and i am not sure i can explain in text what i am asking.. so bear with me...
is there a tutorial or site that will show me step by step how to do the fancy extras, that i see on some web sets? that i can do myself and try to create? i have an example in a folder, and in my mind, and will show anyone who wants to see it so they can tell me how to begin. i know most of it is just huge talent on thier [part, but was hoping i could get a hand starting it. thankyou bj |
||
|
16
on: April 14, 2012, 04:57:57 pm
|
||
| Started by aremgy - Last post by Spawn | ||
|
I run windows 7 and use X2, I have all the VM Filters Patched and working perfectly fine, the FM Patcher works fine with windows 7 I have used it on a fair few plugins
|
||
|
17
on: March 28, 2012, 09:10:53 am
|
||
| Started by aremgy - Last post by Araceli | ||
|
Bellisimo tutorial, me encantó hacerlo
    |
||
|
18
on: March 24, 2012, 03:50:51 pm
|
||
| Started by aremgy - Last post by Suga | ||
|
Per usual of me.. with a twist. One thing you know about me, Rich, is that I can NEVER follow a tut word for word.
  |
||
|
19
on: March 23, 2012, 08:15:14 pm
|
||
| Started by aremgy - Last post by aremgy | ||
|
thanks, Miss Suga...tuts are always good with a twist
nice job! huggs R |
||
|
20
on: March 23, 2012, 02:07:35 pm
|
||
| Started by aremgy - Last post by Suga | ||
|
With a twist.. Awesome tut, hun!
   |
||