 Show Posts Show Posts
|
|
Pages: 1 2 [3] 4 5 ... 14
|
|
31
|
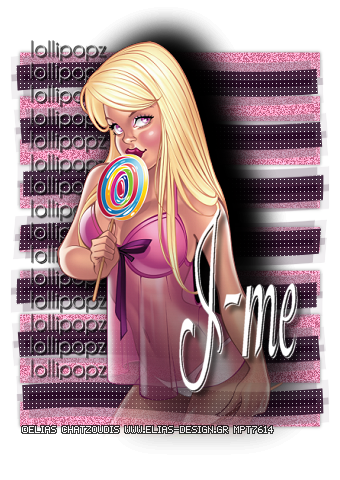
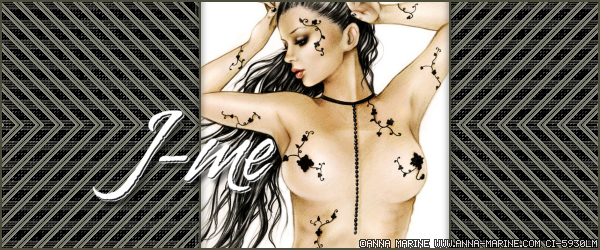
Rich's Tutorials / Tag tutorials / **New** FRAMED, TOO
|
on: January 27, 2012, 10:07:26 pm
|
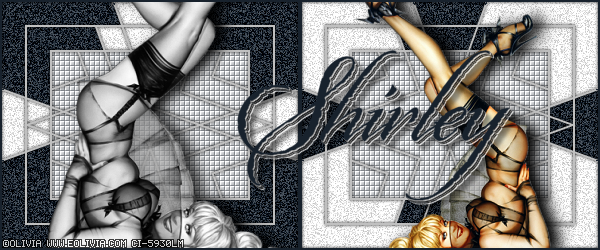
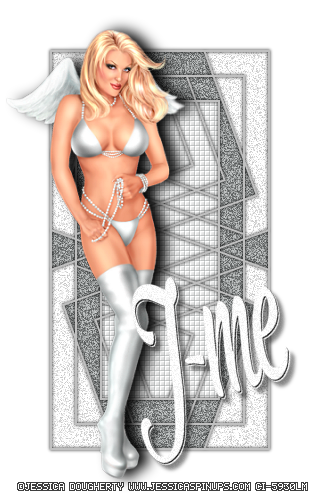
F R A M E D, T O O

This tut was written on January 27, 2012.
It is written using PSPX; I'm sure the same effects are available in other versions.
SUPPLIES
A tube; one that is taller than wide will work best.
I'm using the work of Olivia, formerly signed with CILM.
Unfortunately, she hasn't signed with another company as of this writing.
I'm sure you will find a suitable replacement...
No outside filters!
Font of choice (I used "Origins").
Set your background color to this light gray: #c0c0c0. Set your foreground to a medium to dark color from your tube.
This tut shows how to make a forum set tag/avatar using no scrapkits and no templates.
Then, we will make a bigger tag from the forum set tag.
We'll start with your tube; we need to resize it.
Duplicate the tube by holding down Shift + D at the same time.
Repeat so two copies of the tube; then close down the original tube.
On one of the copies, Image - Resize to 400 pixels high.
Make sure that the Lock Aspect Ratio box is checked.
Adjust - Sharpness - Sharpen.
On the other copy of the tube, Image - Resize to 300 pixels high.
Adjust - Sharpness - Sharpen.
Set both of the tubes aside for a bit.
Open a new image, 200px wide x 150px high.
Selections - Modify - Select Selections Border using Inside, 2, Anti-alias unchecked.
Floodfill the selection with the gray background color.
Selections - Select None.
Image - Canvas Size; we are going to add a space of 25 to all four sides.
To do that, add 50 to both of the original dimensions.
Add 50 to each of the number in the Original Dimensions box and put the new numbers in the New Dimensions box.
Make sure the centered button is pushed in the lower left corner of the window.
If you do it correctly, all four box in the lower right corner of the window will say 25.
The image will now be 250x200.
Repeat the same 2px Selection border.
Image - Canvas Size by another 50 pixels.
The image will now be 300x250.
This layer will be referred to as the top frame layer.
Add a new layer; floodfill with white.
Add a new layer; floodfill with your chosen color.
Image - Canvas Size - this time by 100 pixels.
The image will now be 400x350.
Hide the bottom two layers for now.
Highlight the top frame layer.
Duplicate the top frame layer three times (for a total of four).
Hide the top frame layer for now.
Highlight the middle copy.
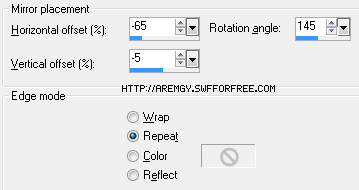
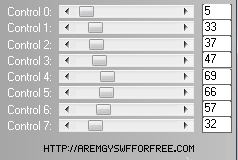
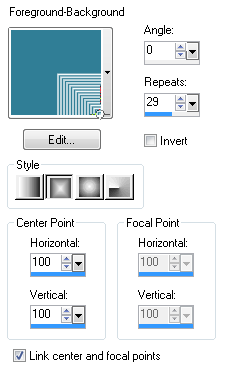
Effects - Reflection Effects - Rotating Mirror using the following setting:
Duplicate this layer; then Image - Flip and Image - Mirror.
Layers - Merge - Merge Down.
Duplicate this merged layer, then Image - Flip one more time.
Unhide the top copy.
Layers - Merge - Merge Visible.
This layer will be called the merged frame layer.
Hide it for now.
You have four layers, from the bottom:
The white layer.
The color layer.
The merged frame layer.
The top frame layer.
Unhide the white layer.
Using the magic wand, click anywhere on the white.
Image - Crop to Selection.
Add both of the set-aside tubes on separate layers.
Image - Canvas Size to 600x250; click on the center left button in the lower left corner.
If you do it correctly, the numbers in the boxes in the lower right corner will read 0, 0, 0, 300.
Unhide both the white layer and the color layer; leave the other layers hidden.
Highlight the color layer; Image - Mirror.
Layers - Merge - Merge Visible.
Hide both of these layers for now.
Unhide the merged frame layer; duplicate it.
Image - Mirror; Layers - Merge - Merge Visible.
Hide this layer.
Unhide the top frame layer; duplicate it.
Image - Mirror; Layers - Merge - Merge Visible.
Hide this layer.
Highlight one of the tube layers.
Image - Mirror.
Adjust - Hue & Saturation - Colorize; both boxes set to 0.
Hide both tube layers for now.
All layers should be hidden.
Unhide the merged frame layer and the top frame layer.
Layers - Merge - Merge Visible.
Unhide the bottom two color layers.
Highlight the frame layer you just merged.
You can see that the tag could be cut equally in half.
One half with the merged layer over a color layer; the other half with the merged layer over a white.
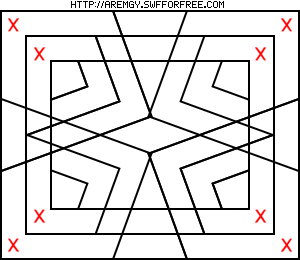
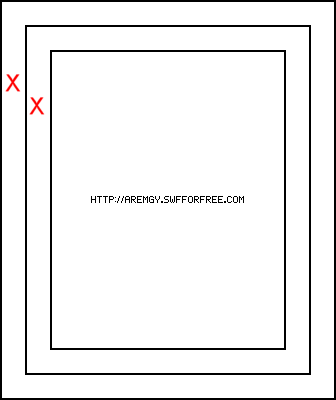
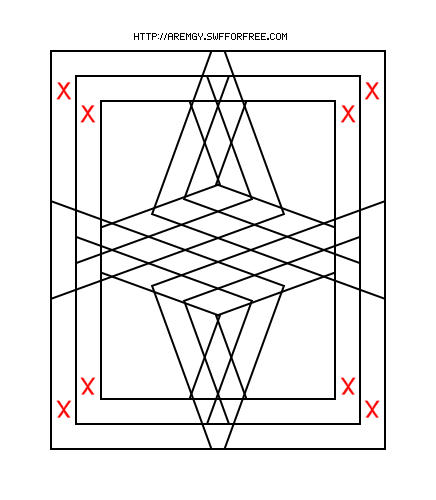
Using the Magic Wand (set to Add (Shift)), click in the spaces shown by the red "X"s on both halves:
(In my testing, the merged frame layers always looked the same; I can't, however, be sure that it always will).
This sample is shown in black & white for ease of demonstration.
You will click 16 times, total.
Selections - Modify - Expand by 1.
Highlight the top color layer.
DELETE.
Selections - Select None.
Hide the merged frame layer for now.
Highlight the top color layer; Layers - Merge - Merge Visible.
Adjust - Add/Remove Noise - Add Noise using Uniform, 45, Monochrome checked.
Hide the color layer for now.
Highlight the top frame layer.
Using your Magic Wand, click in the center of this layer in both halves.
Selections - Modify - Expand by 1.
Add a new layer; floodfill with white.
Selections - Select None.
Duplicate the white layer.
On the top white layer, Effects - Texture Effects - Blinds using the following setting:
(Change the color in the box to match your chosen color.)
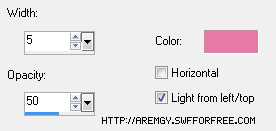
Repeat the Blinds effect; click the box in front of Horizontal.
Effects - Edge Effects - Enhance.
Change the opacity of this layer to 50.
Layers - Merge - Merge Down.
Move this layer below the merged frame layer.
Highlight the frame layer (not the merged frame layer.)
You may DELETED this layer.
There should be five layers, starting from the bottom:
The color layer with the Noise Effect.
The layer with the Blinds Effect you just created.
The merged frame layer.
The two tube layers.
Highlight the merged frame layer.
Effects - 3D Effects - Drop Shadow using 0, 0, 100, 5, black.
Move the tubes into their final positions.
Add the following to both tubes:
Effects - 3D Effects - Drop Shadow set to 0, 10, 100, 20, black.
Add a new layer; add a 2px Selection border using your chosen color.
Add your name and all necessary copyright information.
Save as a .png file.
Now to make the avatar and bigger tag:
Make two copies of your finished tag (Shift + D, twice).
On one of the copies, remove the top border and both tube layers.
Crop to 150x150.
Add a new layer; add a 2px Selection border using your dark color.
Add your name (or initial); add copyright information if necessary.
Save as a .png file.
For the bigger tag:
Using the other copy of your tag; remove the top border and both tube layers.
Layers - Merge - Merge Visible.
Add a new layer; floodfill it with white.
Layers - Arrange - Send to Bottom.
Image - Rotate Left (not Free Rotate).
Image - Canvas Size to 700x450
Image - Resize using 80%; the Resize All Layers box should be UNCHECKED.
Highlight the white layer.
Adjust - Blur - Gaussian Blur using a radius of 20.
Duplicate the white layer; highlight the top white layer.
Repeat the Blind Effect you used on the forum set tag:
On the top white layer, Effects - Texture Effects - Blinds using the following setting:
(Change the color in the box to match your chosen color.)
Repeat the Blinds effect; click the box in front of Horizontal.
Effects - Edge Effects - Enhance.
Change the opacity of this layer to 50.
There is no need to merge together.
Image - Resize using 80%; the Resize All Layers box should be CHECKED.
Add your 400px tube, moving into position.
Add the same drop shadow you used earlier; add this both to the merged layer from the forum set tag and the tube.
Add your name and any necessary copyright information.
Save as a .png file.
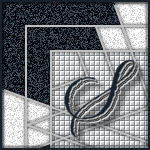
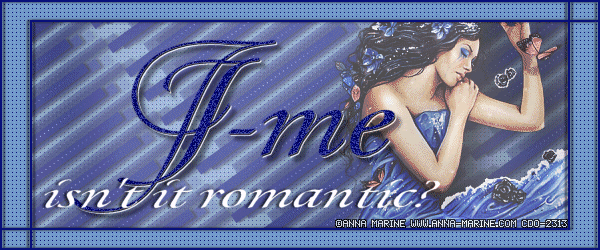
Here is another example, also using the work of Olivia:


|
|
|
|
|
32
|
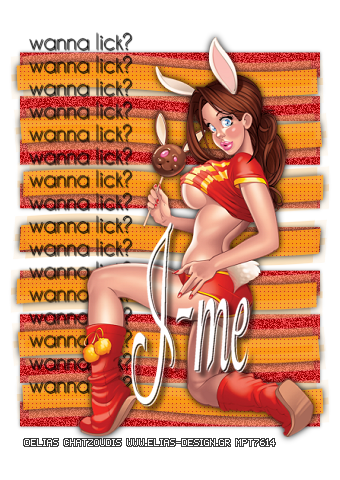
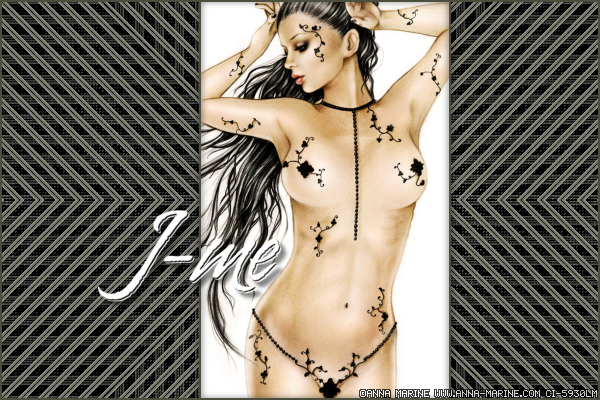
Rich's Tutorials / Tag tutorials / **New** FRAMED
|
on: January 27, 2012, 05:28:05 pm
|
F R A M E D

This tut was written on January 27, 2012.
It is written using PSPX; I'm sure the same effects are available in other versions.
SUPPLIES
A tube; one that is taller than wide will work best.
I'm using the work of Jessica Daugherty, formerly signed with CILM.
A license and tubes for this artist may be purchased from CDO.
No outside filters!
Font of choice (I used "Cider Script").
Set your background color to this light gray: #c0c0c0. Set your foreground to a medium to dark color from your tube.
This tut shows how to make a tag using no scrapkits and no templates.
We'll start with your tube; we need to resize it.
Duplicate the tube by holding down Shift + D at the same time.
Repeat so two copies of the tube; then close down the original tube.
On one of the copies, Image - Resize to 400 pixels high.
Make sure that the Lock Aspect Ratio box is checked.
Adjust - Sharpness - Sharpen.
Set this aside for a bit.
On the other copy of the tube, Image - Resize to 300 pixels high.
There is no need to Sharpen this tube; instead hit DELETE.
We are going to build the tag on this image.
Selections - Modify - Select Selections Border using Inside, 2, Anti-alias unchecked.
Floodfill the selection with the gray background color.
Selections - Select None.
Image - Canvas Size; we are going to add a space of 25 to all four sides.
To do that, add 50 to both of the original dimensions.
Add 50 to each of the number in the Original Dimensions box and put the new numbers in the New Dimensions box.
Make sure the centered button is pushed in the lower left corner of the window.
If you do it correctly, all four box in the lower right corner of the window will say 25.
The height of the image should now be 350 pixels.
The width will vary depending on the size of the original tube.
Repeat the same 2px Selection border.
Image - Canvas Size by another 50 pixels.
The height of the image should now be 400 pixels.
The width will vary depending on the size of the original tube.
Repeat the Selection border.
This time, increase the canvas size by 100 pixels.
The height of the image should now be 500 pixels.
The width will vary depending on the size of the original tube.
Layers - Merge - Merge Visible.
The frame is done; throughout this tut, I will be referring to this as the frame layer.
Using your Magic Wand, click in the spaces between the thin lines of the frame layer.
Click in the general area of the two red "X"s shown below:
(For this screenshot, I've added a white layer below the frame and I made the frame using black)
Add a new layer BELOW the frame layer.
Highlight the new layer, and floodfill the selection with your chosen color.
Selections - Select None.
Hide this layer for now; this layer will be referred to as the color layer.
Highlight the frame layer and duplicate it.
Hide the duplicate for now, work with the original.
Effects - Reflection Effects - Rotating Mirror using the following setting:
Duplicate this layer; then Image - Flip and Image - Mirror.
Layers - Merge - Merge Down.
Duplicate this merged layer, then Image - Flip one more time.
Unhide the top layer.
Layers - Merge - Merge Visible.
This layer will continue to be called the frame layer.
Using the Magic Wand, click on the OUTSIDE of the frame layer.
Selections - Modify - Expand by 1.
Add a new layer; floodfill with white.
Selections - Select None.
Duplicate the white layer.
On the top white layer, Effects - Texture Effects - Blinds using the following setting:
(Change the color in the box to match your chosen color.)
Repeat the Blinds effect; click the box in front of Horizontal.
Effects - Edge Effects - Enhance.
Change the opacity of this layer to 50.
Layers - Merge - Merge Down.
Layers - Arrange - Send to Bottom.
There should be three layers, starting from the bottom:
The background layer you just created.
The color layer.
The frame layer, at the top.
Highlight the frame layer.
Using the Magic Wand (set to Add (Shift)), click in the spaces shown by the red "X"s:
(Depending on the size of the tube, the lines on the frame layer may look different,
but there should be eight corner sections in this basic shape.)
Selections - Modify - Expand by 1.
Highlight the color layer.
Floodfill the selection with white.
Selections - Select None.
Highlight the color layer (that was just filled with white).
Adjust - Add/Remove Noise - Add Noise using Uniform, 45, Monochrome checked.
Make sure all three layers are unhidden.
Highlight the frame layer.
Effects - 3D Effects - Drop Shadow set to 0, 0, 100, 5, black.
Add the tube that was set aside earlier.
Effects - 3D Effects - Drop Shadow set to 0, 10, 100, 20, black.
There is some leeway to moving the tube, just be careful about moving too close to the edge of your image.
Otherwise, you'll have a sharp edge on your finished tag.
Add your name and all necessary copyright information.
Save as a .png file.
Here is another example, also using the work of Jessica Daugherty:
|
|
|
|
|
33
|
Rich's Tutorials / Forum Set tutorials / Re: **New** DUAL
|
on: January 26, 2012, 05:04:10 pm
|
|
the stripes should show up when you used the Toadies - Look, Butthead! a TV.. filter.
the red text in the tut is only if you want to use a single image instead of a tube...
|
|
|
|
|
34
|
Rich's Tutorials / Tag tutorials / **New** AFTERIMAGE
|
on: January 26, 2012, 01:36:18 pm
|
A F T E R I M A G E

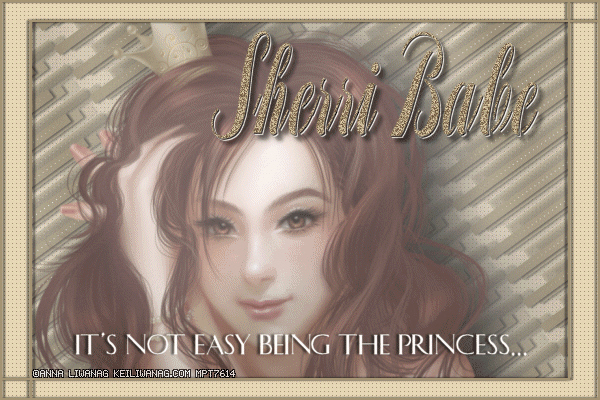
This tut was written on January 26, 2012.
It is written using PSPX; I'm sure the same effects are available in other versions.
SUPPLIES
A tube and a closeup.
I'm using the work of Anna Liwanag, formerly signed with MPT.
A license and tubes for this artist may be purchased from PTE.
The following filters:
L en K - Zitah
MuRa's Meister - Copies
Graphics Plus - Cross Shadow
The fonts I used were " LHF Charlotte" and "Concrete Stencil".
Choose a darker color for your background color; choose a lighter shade of the same color for your foreground.
You may also use contrasting colors, but one of them should be darker than the other.
This tut shows how to make a tag using no scrapkits and no templates.
We will make the larger tag first, then I will show you a shortcut to make both the forum set tag and the avatar.
As a bonus, special shortcuts and keystroke tips will be included in BLUE.
THIS TUT LOOKS LONG, BUT I WANTED TO GIVE ALL MY PSP TRICKS TO YOU.
READ CAREFULLY IF YOU STRUGGLE WITH SOME PARTS OF PSP - THERE MIGHT BE SOMETHING THAT WILL HELP YOU.
We need to add your Drop Shadow to your tubes, because once they are on the tags, we won't be able to add a DS then.
So...open up both your tube and closeup as new images.
If we add a DS now, it will leave a sharp edge on the finished tag.
We need to enlarge the canvas, to leave room for the DS.
Image - Canvas Size.
At the top of the Canvas Size window, you will see the size of your tube (or closeup).
Add 400 to both the width and the height.
Those are the numbers you put in the New Dimension boxes.
EX: If your width is 450, then put 850 in the Width box under New Dimensions.
You'll know you did everything right if all the boxes at the bottom say 200.
That leaves a 200px border around your tube; plenty of room for a DS.
Click OK.
Now add a blurry drop shadow (I used Eye Candy 5 - Perspective Shadow using the Blurry preset).
Set both these tubes aside for a bit.
If you roll the scroll wheel on your mouse toward you (or away from you), it will zoom the image in (or out).
Now, to start the tag!
Open a new image, 600 pixels wide x 10 pixels high.
To do this fast, hit CTRL + N at the same time; that opens the New Image window.
Floodfill with your darker color.
L en K - Zitah using the default setting shown here:
Selection Tool - Custom Selection using the following setting:
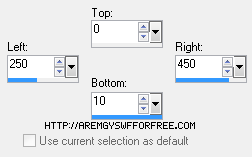
Image - Crop to Selection.
Image - Canvas Size to 600x400, centered.
MuRa's Meister - Copies using the Afterimage(linear) setting; change the number from 8 to 2.
MuRa's Meister - Copies using the Tiling(angle) setting; use the default setting.
Effects - 3D Effects - Drop Shadow using 0, 3, 58, 3, Black.
(We'll be using this DS throughout the tut; later I will show you a nifty shortcut using the DS.)
Repeat the MuRa's Meister - Copies - Afterimage(linear) using the same setting (number set to 2).
Repeat it again.
This layer is complete; later in the tut I will call this the MuRa's layer.
Add a new layer.
To do this faster, hold down the Shift key at the same time you left click on this icon on the Layers window:
Floodfill the new layer with your lighter color.
Effects - Texture Effects - Weave using 1, 3, 1, both boxes set to your darker color, Fill Gaps box checked.
Layers - Arrange - Send to Bottom.
To do this faster, make sure the top layer is highlighted and right click here:

On the menu that pops up, click Arrange - Send to Bottom.
Highlight the top layer; add a new layer.
Selections - Select All.
Selections - Modify - Select Selections Border using Inside, Border Width = 2, Anti-alias unchecked.
Floodfill the selection with your darker color.
Selections - Select None.
Duplicate this layer.
To do this faster, right click on the layer in the Layers toolbar (as shown above), and click on Duplicate.
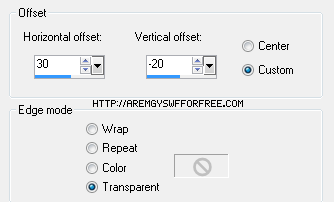
Effects - Image Effects - Offset using the following setting:
Duplicate the offset layer.
Image - Flip; then Image - Mirror.
To do this faster, first hold the CTRL + I key at the same time (to Flip); then hold the CTRL + M key at the same time (to Mirror).
Hide both the background layer and the MuRa's layer.
Layers - Merge - Merge Visible.
To do this faster, right click on any of the three unhidden layers and click on Merge - Merge Visible.
Unhide both hidden layers.
I'll show you how I added the DS to the frame layer later in the tutorial.
Highlight the top layer.
Using your Magic Wand, click in the center of the frame you just created.
Selections - Modify - Expand by 1.
KEEP SELECTED.
Add a new layer above the MuRa's layer.
Floodfill the new layer with white.
Add your closeup as a new layer above the white layer; move it into position using your Move tool.
KEEP SELECTED.
Selections - Invert.
Hit DELETE on the following layers:
The closeup tube layer.
The white layer.
The MuRa's layer.
Selections - Select None.
We need to move the tube below the white layer, so highlight the tube layer and Layers - Arrange - Move Down.
To do this faster, left click on the layer in the Layers toolbar and drag the tube layer below the white layer.
Highlight the white layer.
Adjust - Add/Remove Noise - Add Noise using Uniform, Noise = 10, Monochrome checked.
Graphics Plus - Cross Shadow; all numbers set to 50.
Change the opacity of the white layer to 35.
Duplicate the white layer; then Image - Flip and Image Mirror the duplicate layer.
The tag is done.
Add your name, any word art, and all necessary copyright information.
I added Noise (set at 45) to the name.
I will show you how to animate the tag at the bottom of this tutorial.
To make a forum set tag, read on:
Open a new image, 600 pixels wide by 250 pixels high.
We'll make the border first, so Selections - Select All.
Selections - Modify - Select Selections Border using the same setting.
Floodfill with your darker color.
Selections - Select None.
Duplicate this layer; repeat the Offset effect (using the same setting); duplicate the offset layer then Image - Flip and Image - Mirror.
Merge these three layers together as shown above.
Now we are going to add some of the layers from the 600x400 tag to the 600x250 tag we are working on.
Make sure you have easy access to both images, because there is a fast way to do this:
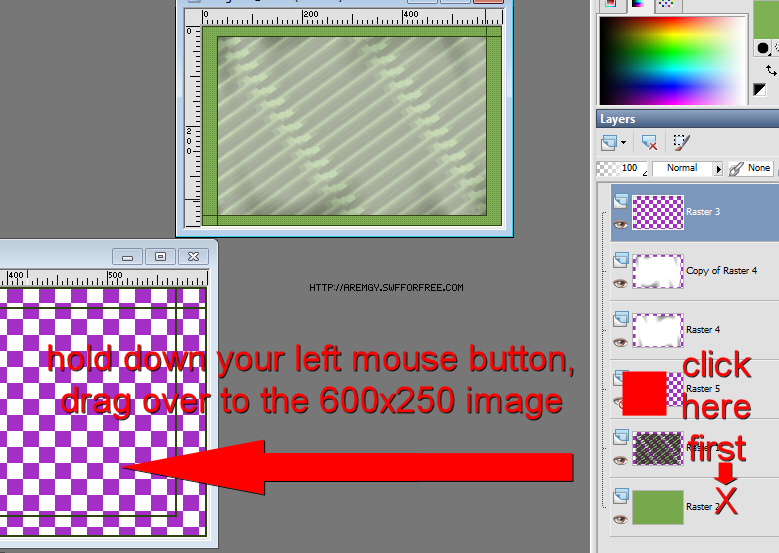
Highlight the background layer of the 600x400 tag
Left click on the background layer in the Layers toolbar.
Hold the left mouse button down and drag the mouse over to the 600x250 tag.
Release the mouse button when you are done.
This will center the background layer on the 600x250 tag.
Like this:
Repeat this dragging process with the MuRa's layer and both white layers.
When you are done, the 600x250 tag will look like this (from the bottom):
The frame you started with.
The background layer.
The MuRa's Layer
Both white layers.
Highlight the frame layer.
Layers - Arrange - Bring to Top.
To do this faster, right click on the frame layer in the Layers toolbar and click on Arrange - Bring to Top.
You can also left click on it and drag it to the top.
Either way, using your Magic wand click in the center of the frame you created.
Repeat the same steps as you used on the 600x400 tag, but add your regular size tube instead of the closeup.
Don't forget to hit DELETE on both white layers.
Add your name, any word art, and all necessary copyright information.
You can drag all of that from your 600x250 tag just like you dragged the layers earlier.
To make the avatar, start with an image of 150 pixels wide x 150 pixels high.
Repeat the same steps:
Create your border, then your frame; remember to merge your frame layers together.
Drag, from the 600x250 tag, the background layer, the MuRa's layer, and only one the white layers.
Bring your frame layer to the top.
Use the magic wand, then expand, invert and delete the white layer and MuRa's layer.
Now, we are going to add the DS to all three of our finished tags.
First, make sure you have easy access to all three.
And make sure the frame layer is highlighted on all of them.
On all three, Effects - 3D Effects - Drop Shadow using the same 0, 3, 58, 3, black we used earlier.
To do this faster, if you hold the Shift key down while you click on the words "Drop Shadow", it will repeat the effect that was last used.
So, add your drop shadow to the 600x400 tag, then move to the 600x250 tag - make sure the frame is highlighted, then hold the Shift key down while clicking on the words "Drop Shadow" - it will repeat the effect.
When you've done all three, we need to repeat the DS on all three tags changing the setting to 0, -3, 58, 3, black.
You can save the avatar as a .png, we are not going to animate it.
Now, to animate both tags:
First, it's easiest to animate if you have the fewest layers possible; so, we are going to merge some layers together.
On both tags, hide the top white layer and everything BELOW.
Right-click on any of the unhidden layers in your toolbar.
Merge - Merge Visible.
Hide this layer (so all layers are hidden).
Next, unhide these layers:
The tube layer.
The MuRa's layer.
The background layer.
Right-click on any of these three unhidden layers.
Merge - Merge Visible.
You now have only four layers:
The top merged layer (with the frame, the name, etc.)
Two white layers (both still hidden)
The bottom merged layer (with the tube, the MuRa's, and the background).
Unhide the TOP white layer.
Edit - Copy Merged.
There are a couple of ways to do this faster:
First, you can hold (all at the same time) the Shift, CTRL and C.
Or you can right-click on the title bar of the tag window (where it says Image XX, "XX" being the number of the image)
Then, from the popup menu, click Copy Merged.
Either way, we are going to open this in AS.
In AS, Edit - Paste as New Animation.
You can also right-click in the workspace of AS and click on Paste as New Animation.
You can also hold the CTRL + V keys while you're in AS.
You have the first frame in AS.
Back in PSP, hide the top white layer.
Unhide the bottom white layer.
Edit - Copy Merged (or one of the other shortcuts above).
In AS, Edit - Paste - After Current Frame.
You can also right click on the title bar of the animation and click on Paste - After Current Frame.
You can also hold the Shift + CTRL + L keys at the same time.
We need to change the speed of the animation.
Edit - Select All.
To do this faster, hold the CTRL + A keys at the same time.
Animation - Frame Properties; change the number from 10 to 45.
To do this faster, hold the Alt + Enter keys at the same time.
The tag is complete.
Save as a .gif file.
To do this faster, click on the F12 key (or Fn + the F12 key on a laptop).
I know this was a long tutorial, but there is a lot of information here (even though the tag itself is rather easy).
These are some of the PSP tricks that I use all the time, I wanted to share them with you!
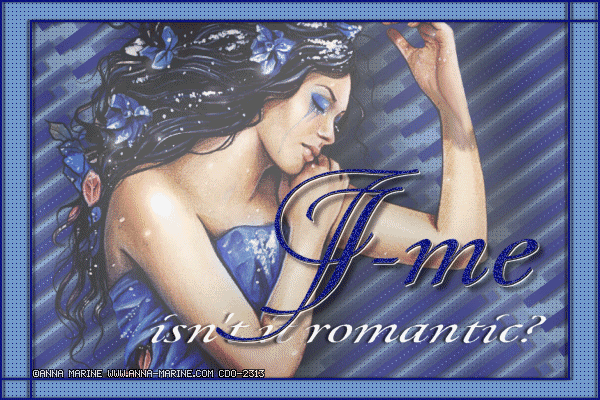
Here is another example, using a beautiful tube by Anna Marine:
|
|
|
|
|
37
|
Rich's Tutorials / Tag tutorials / **New** VEGAS, TOO
|
on: January 25, 2012, 03:57:27 pm
|
V E G A S, T O O

This tut was written on January 25, 2012.
It is written using PSPX; I'm sure the same effects are available in other versions.
SUPPLIES
A tube.
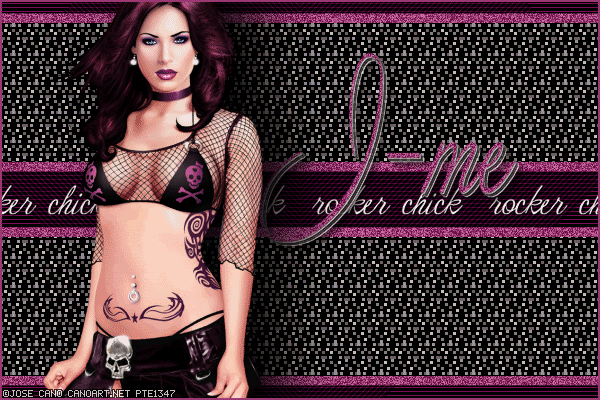
I'm using the work of Jose Cano.
A license and tubes for this artist may be purchased from PTE.
The following filters:
MuRa's Meister - Copies
You'll need the font, "Impact".
Likely, it is already on your computer.
The cursive font I used is "Valentina".
You will also need this animation by Motz Graphics (site currently down).
If you already have the Motz animations, it is in the Mixed folder. It's called "animado_dorado-06"
Otherwise, simply save this animation by right clicking on it and save to your computer.

Choose a color from your tube.
Any color but black will be fine.
This tut shows how to make a tag using no scrapkits and no templates.
I will give the instructions to make everything.
SPECIAL INSTRUCTIONS FOR MAKING A FORUM SET TAG WILL BE IN RED.
Let's begin with the animation.
Open the Motz animation in AS.
Edit - Select All.
Edit - Copy.
In PSP, Edit - Paste As New Image.
Each frame of the Motz animation will be on a separate layer, all named "Frame 1".
Image - Canvas Size to 600 wide by 400 high, centered.
Starting from the bottom, ON EACH LAYER, MuRa's Meister - Copies using the Tiling preset, changing the number from 1 to 2.
When you are finished, save this as a .pspimage (PSP7 compatible)..
Otherwise, it will not open in AS.
If you get a message about changing the image in AS, click "No".
In AS, close the Motz animation.
Open the saved MuRa's .pspimage in AS.
Edit - Select All.
Effects - Apply Image Effects using the Fade to Grey effect.
Animation - Reverse Frames.
Repeat the Fade To Grey effect.
Click in the first frame.
Edit - Copy.
Back in PSP, right click on your workspace.
Paste As New Image.
Add a new layer, floodfill with black.
Edit - Copy.
Back in AS, right click on your workspace.
Paste As New Animation.
You'll need eight frames of this black rectangle.
Either Edit - Duplicate Selected until you have eight frames OR Shift + CTRL + L seven times until you get eight frames.
On both images, Edit - Select All.
There is a button on the top toolbar called "Propogate Paste" (it's the ninth button from the right on the default workspace).
It looks like three diagonal sheets of paper.
Make sure this button is pushed in, it allows you to merge two images together without using the Edit command.
Take your mouse and left click in the first frame Motz animation you created.
Hold the mouse button down.
Carefully drag the mouse down to the first frame of the image with the black rectangles.
Do NOT let go of the mouse button until the frame is properly placed.
If you are having trouble, I've brought a screenshot from another of my tuts that will give you some idea:
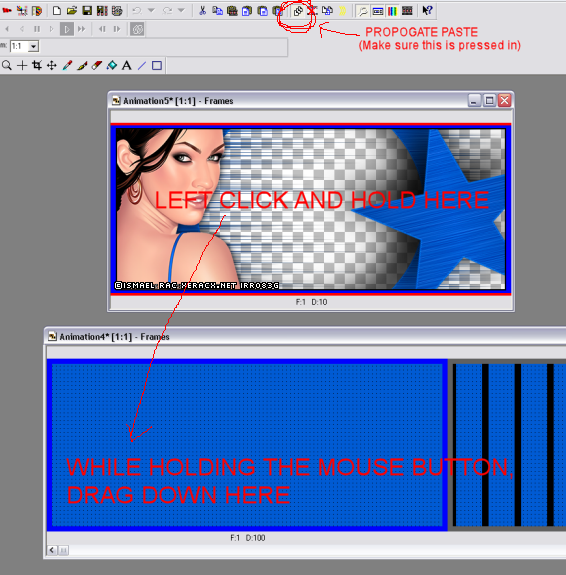
Remember, you want to add the Motz animation ON TOP of the black rectangle.
If you plan on making this tutorial again, I would suggest saving this animation now to your computer.
If you are going to make a forum set tag, Shift + D to make a duplicate of this animation.
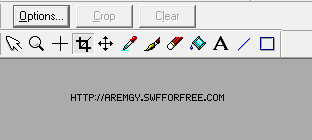
Click on the Crop tool, located just above the default workspace (to the left side).
An Options button will show up, click on that.
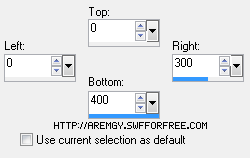
Change the numbers in the Right box to 600 and the Bottom box to 250.
Click OK, then click on the Crop button (next to the Options button).
If you plan on making this tutorial again, I would suggest saving this animation now to your computer.
Highlight the 600x400 animation.
Right click in the first frame; click Copy.
In PSP, right click on your workspace; click Paste As New Image.
Add a new layer, floodfill with black.
Effects - Texture Effects - Weave using 1, 3, 1, both boxes set to your chosen color, Fill Gaps checked.
Effects - Distortion Effects - Wind set to From Left, Wind Speed = 100.
Repeat the Wind effect using From Right.
Effects - Edge Effects - Enhance.
Duplicate this layer.
Image - Free Rotate using Left, 45 degrees, neither box checked.
Effects - Image Effects - Offset using the following setting:

If you are making a forum set tag, omit the Offset effect.
Change the opacity of this layer to 50.
Hide the bottom layer.
Layers - Merge - Merge Visible.
Selection Tool - Custom Selection using the following setting:
If you are making a forum set tag, the bottom number will automatically set to 250.
DELETE.
Duplicate this layer, then Image - Mirror.
Layers - Merge - Merge Visible.
If you are making a forum set avatar, Shift + D NOW to make a duplicate of your image.
Set the duplicate aside for now.
Back to the 600x400 image.
Image - Rotate Left (not Free Rotate).
Set your font to Impact, size 780.
Your background color should be your chosen color, your foreground should be hidden.
Type a double small-case "L" ("ll").
For a forum size tag, only type one small-case "L".
Objects - Align - Center in Canvas.
Layers - Convert to Raster Layer.
Image - Rotate Right (not Free Rotate).
Using your Magic Wand, click in both of the colored stripes.
For a forum set tag, click in the single stripe.
Selections - Contract by 10.
DELETE.
Highlight the merged layer.
DELETE.
Selections - Select None.
Highlight the top layer.
Adjust - Add/Remove Noise - Add Noise using Uniform, 45, Monochrome checked.
If you are adding word art, now is the time for that.
I simply used my script font, "Valentina" (size 48) and typed out several instance of "rocker chick".
Then, Object - Align - Center in Canvas.
This put the word art direct along the wider strip between the two stripes.
I added a small drop shadow to the word art (2, 2, 58, 3, black).
For a forum set tag, you will have to decide where the word art fits best.
It will fit either at the top or the bottom of the empty space.
Add your tube, moving into position.
Add a blurry drop shadow (I used Eye Candy 5 - Perspective Shadow with the Blurry preset).
Add a 2px selection border using your chosen color.
Add your name and all necessary copyright information.
We have to add this part to the animation we made in AS.
To do that, Edit - Copy Merged.
In AS, Edit - Paste as New Animation.
We will add this to the already completed animation in the same way.
Shift + CTRL + L seven times to make eight frames.
Edit - Select All.
Finish up the same way that you added the Motz animation image to the black animation image.
Your tag is finished.
Save as a .gif file.
For a forum set tag, you will add your completed tag (with the tube, name, and necessary copyright information)
to the 600x250 cropped animation you made in AS.
For the avatar:
Working with the duplicate image you set aside earlier, crop to 150x150.
Set your font to Impact, size 300.
Your background color should be your chosen color, your foreground should be hidden.
Type a single small-case "L" ("l").
Using your Magic Wand, click in the single stripe.
Selections - Contract by 10.
DELETE.
Highlight the merged layer.
DELETE.
Selections - Select None.
Highlight the top layer.
Adjust - Add/Remove Noise - Add Noise using Uniform, 45, Monochrome checked.
Unhide the bottom layer (which should be a copy of a frame from the Motz animation layer you created).
Add your name (or initial).
Add a 2px selection border using your chosen color.
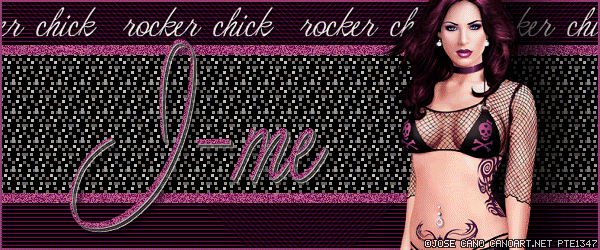
Here is another example, using a free image by Alehandra Vanhek:


|
|
|
|
|
39
|
Rich's Tutorials / Forum Set tutorials / Re: VEGAS
|
on: January 24, 2012, 05:35:02 pm
|
What do you do if you want to try this tut and all you have are PSP versions 7 8 and 9, and don't see where it says
Crop Toolbar - Snap crop rectangle to Current Selection (it's the third icon from the right on the toolbar). That's the problem I have right now. The only option I see is Image / Crop to Selection. Can this be done in versions 7 8 and 9 ?.
the Image - Crop to Selection should work for you, hun... let me know if it doesn't  R |
|
|
|
|
40
|
Rich's Tutorials / Tag tutorials / **New** TWICE
|
on: January 24, 2012, 04:12:19 pm
|
T W I C E
This tut was written on January 24, 2012.
It is written using PSPX; I'm sure the same effects are available in other versions.
SUPPLIES
A tube.
I'm using the work of Elias Chatzoudis, this tube was purchased from MPT.
A license and tubes for this artist may be purchased from PTE.
The following filters:
MuRa's Meister - Copies
Toadies - What Are You?
You'll need the font, "Champagnes & Limousines".
You can get that HERE.
You may also use another narrow font of choice.
The cursive font I used is "AL Heavenly".
Choose two colors from your tube.
You can use a darker/lighter shade of the same color, or two contrasting colors.
This tut shows how to make a tag using no scrapkits and no templates.
I will give the instructions to make everything.
This tut was written especially to use those tubes that, unfortunately, are cut off at the bottom - leaving a sharp edge.
Tubes such as this:
I will show you how to get rid of that sharp edge using a mask.
For this, you will need this mask:

Right-click and save to your mask folder.
You may also open directly to your PSP.
To do that, right click on the element and hit Copy Image.
In PSP, right click on your workspace and hit Paste as New Image.
Let's start with the tube.
First, Image - Resize so the tube is 400 pixels high.
Adjust - Sharpness - Sharpen.
Image - Rotate Left (not Free Rotate).
If you have saved the mask to your computer, I will give those instructions shortly in RED.
If you have opened the mask onto your workspace, read on:
Make sure your tube is the image you are working with.
Layers - New Mask Layer - From Image.
Find the mask from the dropdown box; it will be listed as Image XX (where XX is the number of the image that is open).
Make sure that the radial button before Source Luminance is checked.
And the button before Invert Mask Data is UNCHECKED.
Click OK.
Layers - Merge - Merge Group.
Image - Rotate Right (not Free Rotate).
If you have saved the mask to your computer, follow these instructions:
Layers - Load/Save Mask - Load Mask from Disk.
Find the mask from the dropdown box; it will be listed as the name you used to save it.
I've named this mask "12" so that it shows at the top of my masks list.
Make sure that the following radial buttons are checked - Fit to canvas, Source luminance, and Hide all mask.
And the button before Invert Transparency is UNCHECKED.
Click OK.
Layers - Merge - Merge Group.
Image - Rotate Right (not Free Rotate).
Your tube is now ready for use.
Set it aside for a bit while we work on the tag.
Open a new image, 300 wide x 25 high.
Floodfill with one of your colors; this will be the layer with the Noise effect.
Add a new raster layer.
Floodfill with your other color; this will be the layer with the Wave effect.
Image - Canvas Size to 340 wide x 480 high, centered.
Highlight the bottom layer (you may wish to hide the top layer.)
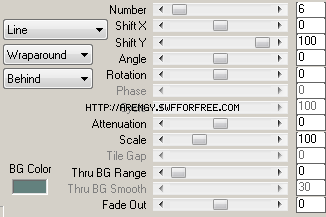
MuRa's Meister - Copies using the Line preset with the following settings:

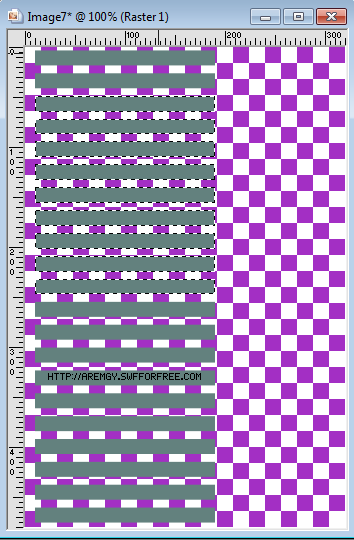
Using your Magic Wand - set to Add(Shift) - click in both the top and the bottom stripe.
DELETE.
Add/Remove Noise - Add Noise using Uniform, 45, Monochrome checked.
Effects - 3D Effects - Drop Shadow using 0, 0, 50, 5, black.
Highlight the top layer (unhide if necessary).
MuRa's Meister - Copies using the same setting but change the 11 to 9.
Using your Magic Wand - set to Add(Shift) - click in both the top and the bottom stripe.
DELETE.
Effects - Distortion Effects - Wave using the following settings:

Duplicate the top layer.
Highlight the duplicate layer (which would be the top layer).
Effects - Distortion Effects - Wave using the following settings:
Effects - Texture Effects - Weave using 1, 3, 1, Fill Gaps checked.
Use either black, white, or your other color in both boxes.
Effects - 3D Effects - Drop Shadow using 0, 0, 100, 10, black.
Change the opacity of this layer to around 85.
Highlight the original layer (which would be the middle layer).
Toadies - What Are You?; change both number to 10.
Now we will make the word art.
Set your font to "Champagne & Limousines" (or your chosen narrow font); size 24, Anti-alias set to Smooth.
As a vector, type out your work or phrase.
It's meant to be small, so you may have to adjust your size (depending on your version of PSP).
Objects - Align - Center in Canvas.
Layers - Convert to Raster Layer.
MuRa's Meister - Copies using the same setting but change the number from 9 to 21.
This is where it can get a little tricky.
Selection Tool set to Rectangle.
You want to draw a rectangle around the word art that you wish to KEEP.
In my sample, I've kept 15 of the repeated words.
You may choose any number.
Start your selection close to the left hand side, directly above where the top of your word art will begin.
Draw over to the right, ending just to the right.
DO NOT REMOVE YOUR FINGER FROM THE MOUSE.
Now, draw down until you are just below the bottom line you wish to keep.
When you are happy, release the mouse button.
You will see a selection box marching ants around the word art you wish to keep.
Selections - Invert.
DELETE.
Effects - 3D Effects - Drop Shadow using 1, 1, 100, 1, black.
Use your Move tool to move into your chosen position.
Add, as a new layer, the tube you worked on earlier
Effects - 3D Effects - Drop Shadow using 0, 0, 100, 10, black.
You may have adjust this depending on the size of the tube.
(The above sample has a different drop shadow.)
Add your name and all necessary copyright information.
Your tag is finished.
Save as a .png file so the background will be transparent.
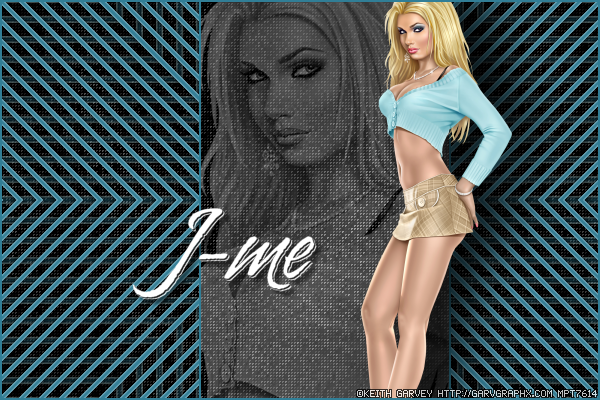
Here is another example, using a wonderful image by Elias Chatzoudis:
|
|
|
|
|
41
|
Rich's Tutorials / Tag tutorials / **New** HEARTS
|
on: January 24, 2012, 11:22:36 am
|
H E A R T S
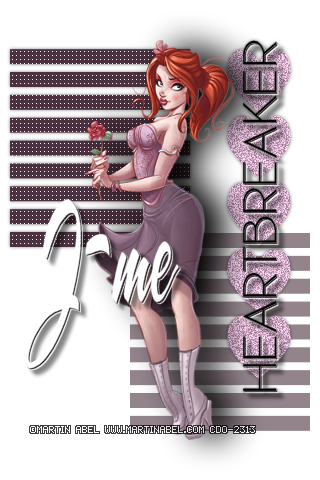
This tut was written on January 24, 2012.
It is written using PSPX; I'm sure the same effects are available in other versions.
SUPPLIES
A tube.
I'm using the work of Martin Abel.
A license and tubes for this artist may be purchased from CDO.
Choose a tube that is higher than it is wide.
Image - Resize to 400 pixels high.
Adjust - Sharpness - Sharpen.
The following filters:
MuRa's Meister - Copies
You'll need the font, "Champagnes & Limousines".
You can get that HERE.
You may also use another narrow font of choice.
The cursive font I used is "A&S Snapper Script".
Set your foreground color to a darker color from your tube; set your background color to a lighter shade of the same color.
You may also use two contrasting colors from your tube.
This tut shows how to make a tag using no scrapkits and no templates.
I will give the instructions to make everything.
You will need this element:

Right-click and save to your computer.
You may also open directly to your PSP.
To do that, right click on the element and hit Copy Image.
In PSP, right click on your workspace and hit Paste as New Image.
Either way, we are starting with the element.
Image - Canvas Size to 75 wide x 400 high, centered.
MuRa's Meister - Copies using the Line preset and the following setting:
Using your Magic Wand - set to Add(Shift) - click in each of the five complete hearts.
Selections - Invert.
DELETE.
Selections - Select None.
Selections - Select All.
Selections - Float.
Selections - Defloat.
Add a new layer.
Floodfill the selection with the lighter of your two colors.
Selections - Select None.
Add/Remove Noise - Add Noise - Uniform, 45, Monochrome checked.
Image - Rotate Right (not Free Rotate).
Change your background color to black, white, or a color of your choice.
Pick "Champagnes & Limousines" (or your chosen narrow font); size 48, Anti-alias set to smooth.
Set your font to vector.
Type out your word or phrase (I used "HEARTBREAKER").
Objects - Align - Center in Canvas.
You can stretch the wordart out by using the center of three little nodes on either side of the vector box.
When it is stretched to your liking, repeat the Center in Canvas to keep things neat.
Layers - Convert to Raster Layer.
Image - Rotate Left (not Free Rotate).
Add a small drop shadow to your word or phrase (I used 1, 1, 100, 1, white and 1, 1, 100, 1, black).
Layers - Merge - Merge Visible.
Set this aside for a bit.
Open a new image - 180 wide by 15 high.
Floodfill with your darker color.
Image - Canvas Size to 320 wide by 480 high.
Click the center button, but change the number in the Left box to 10; the number in the Right box will adjust itself.
MuRa's Meister - Copies using the same setting as earlier, but change the number from 6 to 21.
Using the Magic Wand, we are going to highlight some of the stripes.
Starting from the top, skip the first two stripes.
Highlight the next nine stripes down.
Something like this:
Selections - Invert.
DELETE.
Duplicate this layer.
On the bottom layer, Image - Flip then Image - Mirror.
Change the opacity of the bottom layer to 60.
Highlight the top stripe layer.
Effects - Texture Effects - Weave using 1, 3, 1, Fill gaps checked.
Change the color of both boxes to black, white, or a color of your choice.
Add a drop shadow (I used 0, 0, 50, 5, black).
As a new layer, add the completed element you set aside earlier.
Move into position as shown in the sample.
Add the same drop shadow you used on the stripes.
Add your tube as a new layer.
Effects - 3D Effects - Drop Shadow using 0, 20, 100, 50, black.
Add your name and all necessary copyright information.
Your tag is finished.
Save as a .png file so the background will be transparent.
Here is another example, using a wonderful image by Elias Chatzoudis:

|
|
|
|
|
42
|
Rich's Tutorials / Forum Set tutorials / Re: DIAMONDS
|
on: January 24, 2012, 07:51:36 am
|
Actually I just did a google search for that image and found it. It didn't have a copyright on it. I can delete it if you want though.
it's important that you only used copyright compliant images...if you go to The Zone Groups ( www.thezonegroups.com), there are a lot of people there that can help you find images you can use here... huggs R |
|
|
|
|
43
|
Rich's Tutorials / Forum Set tutorials / **New** DARWIN
|
on: January 23, 2012, 06:12:51 pm
|
D A R W I N

This tut was written on January 23, 2012.
It is written using PSPX; I'm sure the same effects are available in other versions.
SUPPLIES
A tube and a closeup.
I'm using the work of Keith Garvey.
This tube was purchased from MPT.
A license and tubes for this artist may be purchased from PTE.
The following filters:
Simple - Diamonds
Toadies - Darwin
Xero - Fritallary
Graphics Plus - Cross Shadow
Font of choice (I'm using "Almond Script")
Set your foreground color to a darker color from your tube; set your background color to white.
Make a foreground gradient with the following settings:
This tut is a little different from other tuts I've written.
I'm going to show you how to make a tag first, then I'll show you how to turn that tag into a forum set.
Open a new image, 600 wide x 600 high.
Floodfill with your gradient.
Selections Tool - Custom Selection using the following setting:
Selections - Invert.
DELETE.
Selections - Select None.
Duplicate this layer; Image - Flip.
Layers - Merge - Merge Visible.
Duplicate this layer; Image - Mirror.
Layers - Merge - Merge Visible.
Duplicate this layer.
On the top layer, Simple - Diamonds.
On the top layer, Toadies - Darwin.
Effects - 3D Effects - Drop Shadow using 0, 0, 100, 10, Black.
On the bottom layer, Toadies - Darwin.
Effects - Edge Effects - Enhance.
Change the opacity of this layer to 35.
Layers - Merge - Merge Visible.
Set this image aside for a bit.
Open a new image 600 pixels wide x 400 pixels high.
Floodfill with black.
Xero - Fritallary using 3, 30, 10, 10.
Effects - Edge Effects - Enhance.
Graphics Plus - Cross Shadow using the default setting.
Add, as a new layer, the 600x600 image you created earlier.
(This always puts a new layer in the exact center.)
Selection Tool - Custom Selection using the following setting:
(The bottom number should be 400...thanks, Miss Shirley!)
DELETE.
Selections - Select Selection Borders using Both Sides, 1, Anti-alias unchecked.
Add a new layer and floodfill the selection with your darker color.
Selections - Select None.
Using your magic wand, click into the middle of the border selection you just made.
Selections - Modify - Expand by 1.
Add your closeup (or image) as a new layer.
Selections - Invert.
DELETE.
Selections - Select None.
Move this layer directly above your black background layer.
Change the setting of this layer to Luminance (legacy); change the opacity to 35.
(If you are using an image, omit this step.)
Add your tube, moving into position.
Add a blurry drop shadow (I used Eye Candy 5 - Perspective Shadow).
Add a 2px Selection border, using your darker color.
Add your name and all necessary copyright information.
Your tag is done; if you want to make a forum set, continue with these instructions:
Make a copy of your 600x400 - Shift + D.
Selection Tool - Custom Selection using the following setting:
You'll need to move your closeup, your tube (or your image) down a bit so it will fit correctly between the marching ants.
When you are happy with the position, Image - Crop to Selection.
(You can simply crop the duplicate tag to 600x250, but the Darwin element will not be centered.)
Selections - Select None.
Add your 2px Selection Border, using your chosen color.
Add your name and all necessary copyright information.
For the avatar:
Duplicate your tag (Shift + D.)
Remove all unnecessary layers.
Crop to 150x150.
Add a new layer.
Add a 2px Selection border, using your chosen color.
Add your name (or initial) and all necessary copyright information.
Here is another example, using a beautiful image by Anna Marine:

|
|
|
|
|

