|
aremgy
|
 |
« on: March 07, 2011, 02:27:05 pm » |
|
B L E N D E R

This tut was written on March 7, 2011.
It is written using PSPX; I'm sure the same effects are available in other versions.
SUPPLIES
A tube.
I'm using the work of Keith Garvey.
This tube was purchased when this artist was with MPT.
You may purchase a license to use this work at PTE.
The following filters:
Krusty's FX, Vol I 1.0 - Transparent Blender
Unplugged Effects - Tangent Deform
MuRa's Meister - Copies
Xenofex2 - Constellation
Font of choice (I'm using "Ambiance BT")
Let's begin!
Choose two colors from your tube, a lighter color for the foreground and a darker for the background.
Prepare a foreground linear gradient - Angle = 0, Repeats = 0, you want the lighter color on top.
Open a new image, 600x600
Fill with your darker color.
Krusty's FX, Vol I 1.0 - Transparent Blender chaning the Blends Amount from 6 to 4.
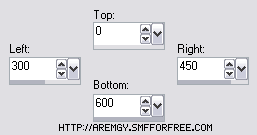
Selection Tool - Custom Selection using the following setting:
Selections - Invert
DELETE
Duplicate this layer.
Image - Mirror.
Layers - Merge - Merge Visible.
Set this aside for a bit.
Open a new image, 600x250.
Floodfill with your gradient.
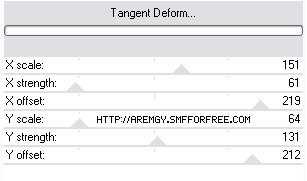
Unplugged Effects - Tangent Deform using the following setting:
Effects - Edge Effects - Enhance.
Repeat the Enhance.
Add your Blender image that you set aside to this image as a new layer.
Crop to 600x250.
Duplicate this layer.
On the original layer, MuRa's Meister - Copies using the Line preset, changing the number from 8 to 3.
On each of this three layer, Xenofex2 - Constellation using the following setting:

(NOTE - Depending on your chosen colors, this Constellation effect may not show very well.
You can increase the Overdrive to make the effect more prominent.)
Highlight the top Blender layer.
Selections - Select All
Selections - Float
Selections - Defloat
Add your tube, moving into position.
Selections - Invert
DELETE.
Change the layer setting of the tube layer to Luminance (not Legacy)
Change the layer opacity to 70.
These are suggestions, you may choose other settings...
Add a 2px Selection border, using your dark color.
Effects - 3D Effects - Drop Shadow using 2, 2, 58, 3, black and -2, -2, 58, 3, black.
Add your name and all necessary copyright information.
Animate as usual.
For the avatar:
Duplicate your tag (Shift + D.)
Delete the layers with your tube and top Blender layer.
Crop to 150x150.
Add your name (or initial.)
Here is another example, using the work of Lorenzo DiMauro:

|
|
|
|
« Last Edit: July 11, 2011, 10:57:17 am by aremgy »
|
Report Spam
 Logged
|
|
|
|
|


|
Shirley
Newbie

Posts: 22

|
|
« Reply #1 on: March 08, 2011, 03:37:02 pm » |
|
Awesome Tutorial Rich!
I left you a little Pressie in Beverly's Challenge over at the Zone.
|
|
|
|
susy
Newbie
Posts: 21
|
|
« Reply #2 on: March 09, 2011, 08:52:53 am » |
|
Oooo, I like the red one.
I'll be back. LOL
|
|
|
|
|
|
|
|
aremgy
|
|
« Reply #4 on: March 18, 2011, 10:10:11 pm » |
|
very pretty, SB....nice tube  love this set without the blender effect, too.... huggs R |
|
|
|
|
|
sherribabe
|
|
« Reply #5 on: March 18, 2011, 10:12:43 pm » |
|
LOL! Glad you liked it. For some reason, I just couldn't get the effect to look right, so I left it like that. Will try again, another time. |
|
|
|
|
|
|
aremgy
|
|
« Reply #7 on: March 27, 2011, 07:00:27 am » |
|
thanks, Miss Sherri!
just lovely...
|
|
|
|
|
|
|
|

