|
aremgy
|
 |
« on: November 15, 2010, 01:27:26 pm » |
|
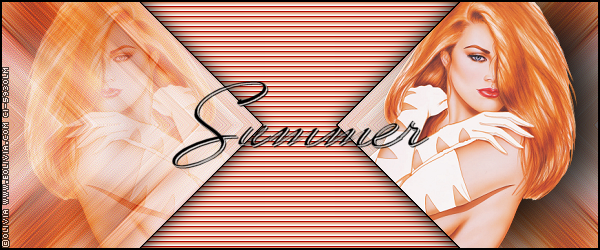
B L I N D S


This tut was written on November 15, 2010.
It is written using PSPX; I'm sure the same effects are available in other versions.
SUPPLIES
A tube.
I'm using the work of Celine.
This tube was part of the 2010 MPT Christmas Gift.
You need to purchase a license to use this work, and can find other tubes by this artist, at MPT.
The following filters:
MuRa's Meister - Copies
DSB Flux - Bright Noise (optional)
Font of choice (I'm using "Uplink")
Let's begin!
Open a new image, 600x250
Fill with a color from your tube.
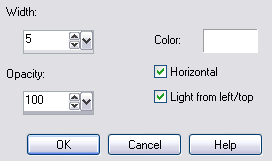
Effects - Texture Effects - Blinds using the following setting:
Effects - Edge Effects - Enhance.
If you are animating:
Duplicate this layer 2x (for a total of three.)
Apply DSB Flux - Bright Noise set at 25 to each layer, click the radial button before Mix each time.
Add your tube as a new layer.
MuRa's Meister - Copies using the Wallpaper(rotate) preset.
Adjust - Blur - Motion Blur set at Angle = 315, Strength = 100.
Repeat.
Effects - Edge Effects - Enhance.
Repeat.
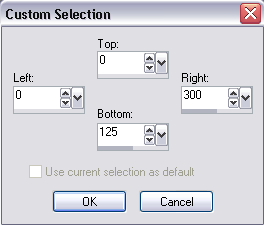
Selection Tool - Custom Selection using the following setting:
Selections - Invert.
DELETE
Duplicate this layer, then Image - Flip.
Layers - Merge - Merge Down.
Duplicate this layer, then Image - Mirror.
Layers - Merge - Merge Down.
Set this image aside for a moment.
Open a new image, 400x400.
Fill with your color.
Add this new image to your previous image as a new layer.
Image - Free Rotate - Right, 45 degrees.
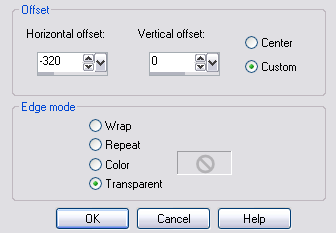
Effects - Image Effects - Offset using the following setting:
Crop to size (600x250.)
Selections - Select All.
Selections - Float.
Selections - Defloat.
Selections - Invert.
Highlight the blurred layer.
DELETE.
Selections - Select None.
Delete the solid layer.
Duplicate the blurred layer.
Image - Mirror.
On the mirrored layer, Selections - Select All.
Selections - Float.
Selections - Defloat.
Add your tube, moving into position.
Selections - Invert.
DELETE.
Duplicate the tube layer.
Image Mirror.
Change the layer setting of this layer to SOFT LIGHT.
Merge the two BLURRED layers together.
(Highlight the top blurred layer, then Layers - Merge - Merge Down.)
Selections - Select All.
Selections - Float.
Selections - Defloat.
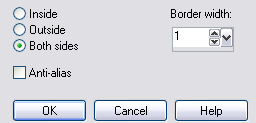
Selections - Modify - Select Selections Border using the following setting:
Add a new layer to the top, and fill the selection with your border color.
Selections - Select None.
Add a blurry drop shadow to your merged blurred layer (I used 0, 0, 100, 25, black.)
Add a 2px selection border using the same color.
Add your name and all necessary copyright information.
Animate as usual.
For the avatar:
Duplicate your tag (Shift + D.)
Delete the layer with your tube.
Crop to 150x150.
Add your 2 pixel selections border.
Add your name (or initial.)
You may, if you wish, choose to animate your avatar.
Here is another example, non-animated, using the work of Olivia:

|
|
|
|
« Last Edit: March 04, 2011, 08:35:40 pm by aremgy »
|
Report Spam
 Logged
|
|
|
|
|


|
Lithium Flower
Newbie

Posts: 10
The Norwegian PSP'er

|
|
« Reply #1 on: November 17, 2010, 12:14:01 pm » |
|
Awesome tut as usual. I just made this for a few of the girls over at DSI    |
|
|
|
|
aremgy
|
|
« Reply #2 on: November 17, 2010, 02:44:11 pm » |
|
great, Miss Lithy!
make sure you tell them i said "hi!"..
|
|
|
|
|
|
|
|

