|
aremgy
|
 |
« on: November 10, 2010, 12:54:32 pm » |
|
W A V Y

This tut was written on November 10, 2010.
It is written using PSPX; I'm sure the same effects are available in other versions.
SUPPLIES
A tube.
I'm using the work of Keith Garvey. You need to purchase a license to use this work at MPT.
The following filters:
MuRa's Meister - Cloud
MuRa's Seamless - Shift At Wave
MuRa's Meister - Copies
Xero - Fritallary
You will also need a heart preset shape.
If you don't have one, you can right click and save this element.

Font of choice (I'm using "Leisure Script")
Let's begin!
Open a new image, 600x250
MuRa's Meister - Clouds using the default setting...click on the Reset Colors button, if necessary.
Duplicate this layer twice (for a total of three.)
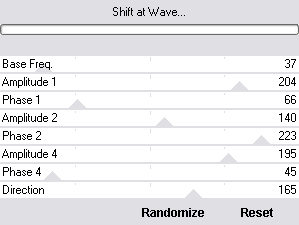
On the top layer, MuRa's Seamless - Shift At Wave using the following setting:
Effects - Edge Effects - Enhance.
Repeat for the other two layers, change the Base Freq. to 47 for the second layer, and 57 for the third.
Make sure to repeat the Enhance on both layers.
Highlight the top layer.
Change the foreground color to null and change the background to a contrasting color from your tube.
Working with only the background color, and a heart preset shape, draw a smallish heart (approx. 45p high.)
Layers - Convert to Raster Layer, if necessary.
(If you're using the element, add it as a new layer.
Select All, Float, Defloat.
Add a new layer, and fill the selection with the contrasting color.
Select None, then delete the first element layer.)
MuRa's Meister - Copies using the default Tiling(angle) preset, but change the Tile Gap to 3.
Duplicate the heart layer.
Hide the top layer for now.
Working on the bottom layer, Selections - Select All.
Selections - Float.
Selections - Defloat.
Selections - Modify - Contract by 2.
DELETE.
Selections - Select None.
Add a thin drop shadow (I used 1, 1, 100, 1, black.)
Unhide the top layer, and highlight it.
Using the magic wand, click in any blank space.
Selections - Modify - Expand by 2.
Fill the selection with your contrasting color.
Selections - Invert.
DELETE.
Selections - Select None.
Xero - Fritallary using the following setting:
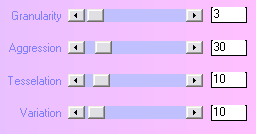
Change your background color back to its original color and add a 2px selection border.
Add a blurry drop shadow to your border (I used 2, 2, 58, 3, black and -2, -2, 58, 3, black.)
Add your name and all necessary copyright information.
Animate as usual.
For the avatar:
Duplicate your tag (Shift + D.)
Delete the layer with your tube.
Crop to 150x150.
Add your 2 pixel selections border.
Add your name (or initial.)
You may, if you wish, choose to animate your avatar.
Here is another example, using the work of Elias Chatzoudis:


|
|
|
|
« Last Edit: March 04, 2011, 08:34:25 pm by aremgy »
|
Report Spam
 Logged
|
|
|
|
|


|
|
|
|

