|
aremgy
|
 |
« on: October 23, 2010, 12:55:54 pm » |
|
G L I T Z

This tut was written on October 23, 2010.
It is written using PSPX; I'm sure the same effects are available in other versions.
SUPPLIES
A tube and a closeup.
I'm using the work of Keith Garvey. You need to purchase a license to use this work from MPT.
The following filters:
Greg's Factory Output, Vol. II - Pool Shadow
MuRa's Meister - Copies
RCS Filter Pack 1.0 - Screenworks Grid available HERE
Alien Skin Xenofex 2 - Constallation
Word art of choice (optional).
Font of choice (I'm using "Stephanie Marie").
Let's begin!
Pick two colors from your tube - a lighter color in the foreground, a darker color in the background.
Open a new image, 600x250.
Fill with any color except black - black won't work with upcoming steps.
Adjust - Add/Remove Noise - Add Noise using Uniform, 12, Monochrome checked.
Greg's Factory Output, Vol. II - Pool Shadow using the default setting.
(If that is too strong for your color, change the Intensity to 50.)
Add your closeup, moving it into position.
Adjust - Hue and Saturation - Colorize setting both to 0.
Change the layer setting of the closeup layer to Luminance (Legacy).
Change the opacity to approx. 30.
Set this aside for a moment.
Open a new image, 700x35.
Fill with your dark color.
Add this to your first image as a new layer.
Do not CROP to fit.
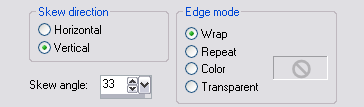
Effects - Geometric Effects - Skew using the following setting:
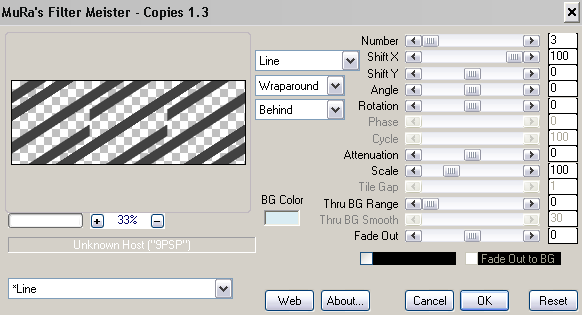
MuRa's Meister - Copies using the following setting:
Duplicate this layer.
Image - Mirror.
Merge these two layers together.
RCS Filter Pack 1.0 - Screenworks Grid using the default setting.
Using your magic wand, click on the black area.
Selections - Promote as New Layer.
On the promoted layer, floodfill the selection with your light color.
Selections - Select None.
Delete the grid layer.
Add your tube, and a blurry drop shadow (I used Eye Candy 5: Impact - Perspective Shadow with the Blurry preset).
Using your Selection tool (set to rectangle, or point-to-point (if necessary)),
draw a selection through your tube toward your closeup as shown:
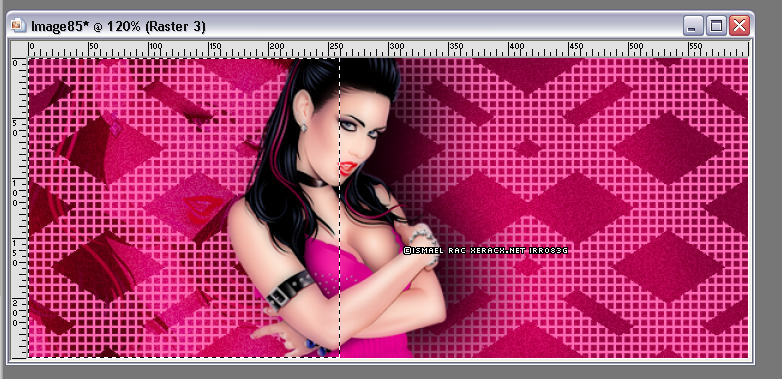
Highlight the promoted layer, DELETE.
Selection - Select None.
Duplicate the promoted layer twice (for a total of three.)
On each layer, Xenofex 2 - Constellation with the following setting:
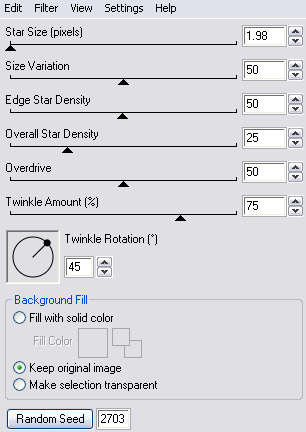
(Click the Random Seed button each time.)
Add a 2px selection border in your darker color (or black).
Add your name, and any necessary copyright information.
Animate as usual.
For the avatar:
Duplicate your tag (Shift + D.)
Remove the layers with art.
Crop to 150x150.
Add your 2 pixel selections border.
Add your name (or initial.)
You may, if you wish, choose to animate your avatar.
Here is another example, using the work of Ismael Rac:


|
|
|
|
« Last Edit: March 04, 2011, 08:33:30 pm by aremgy »
|
Report Spam
 Logged
|
|
|
|
|


|
|
|
|
aremgy
|
|
« Reply #2 on: October 27, 2010, 10:24:05 am » |
|
wow!
that's awesome!!
thanks, Miss Sherri!!
|
|
|
|
|
|
|
|

