|
aremgy
|
 |
« on: October 16, 2010, 01:31:20 pm » |
|
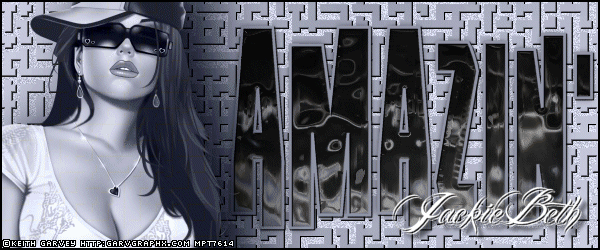
AMAZIN'


This tut was written on October 16, 2010.
It is written using PSPX; I'm sure the same effects are available in other versions.
SUPPLIES
A tube, preferably a closeup.
I'm using the work of Ismael Rac. You need to purchase a license to use this work from his store HERE.
The following filters:
VM Mighty Maze
Xero - Porcelain (optional)
Eye Candy 5: Impact - Chrome
A chunky font (I'm using a FTU font called "FirepowerBB") and a script font (I'm using a FTU font called "Billy Argel Font").
Let's begin!
Choose a darker color for the foreground, and a lighter for the background.
Make a foreground gradient - Sunburst, Repeats - 3.
Open a new image, 600 x 250.
Fill with the lighter color.
Adjust - Add/Remove Noise - Add Noise at Uniform, 25, Monochrome checked.
Add a new layer, floodfill with the gradient
VM Mighty Maze using the following setting:

Using your magic wand, carefully click on a WHITE section.
Selections, Modify, Select Color Range using the following setting:
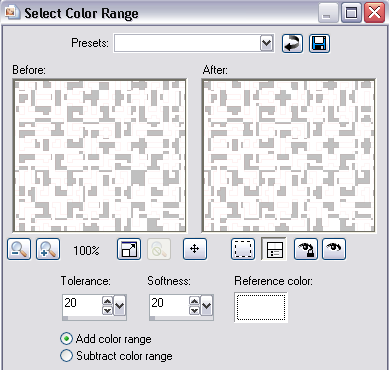
This should select all the white in your image.
DELETE.
Selections - Select None.
Add a sharp drop shadow (I used 1, 1, 100, 1, black).
Add your tube, moving it to the left.
Change the layer setting of the tube layer to Luminance (Legacy).
(If you find that the "maze" is showing through your tube, you will need to add a layer UNDER the tube.
To do this:
Make sure the tube layer is highlighted.
Select - All
Select - Float
Select - Defloat
Add a new layer UNDER the tube and fill the selection with your lighter color.
Select - None.
Then, change the layer setting of the tube layer to Luminance (Legacy).
Merge these two layers together.)
Add a chunky drop shadow to the tube layer (I used Eye Candy 5 - Perspective Shadow using the Blurry setting).
Change your foreground gradient to just the darker color. Hide your background color for now.
Set the stroke properties on the Font toolbar to 3.
Using your chunky font, type out AMAZIN'.
Using the magic wand, click inside all seven characters.
Selections - Modify - Expand by 2.
Add a new layer UNDER the word art and fill with your lighter color.
Select - None.
Duplicate this filled layer 3x.
On the bottom layer, add a chunky drop shadow (I used 0, 0, 100, 10, black).
On the outlined AMAZIN' layer, add a sharp drop shadow (I used 1, 1, 100, 1, black).
Now for the three filled layers that will be animated:
Highlight the top filled layer.
Eye Candy 5: Impact - Chrome using the Black Latex preset with the following settings:
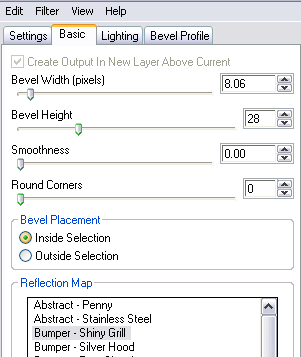
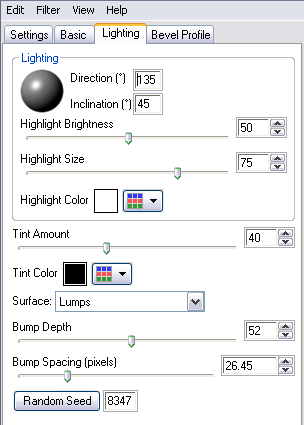
Repeat on the other two layers, click the Random Seed button (on the Lighting tab) each time.
Move your tube layer above the word art.
Add a 2px selection border layer in black.
Add your name and any necessary copyright information.
Animate as usual.
Change the frame properties to 30.
For the avatar:
Delete everything except the bottom two layers (the maze layer, and the background layer).
Crop to 150 x 150.
Add a 2px selection border.
Add your name or initial.
Here is another example, using the work of Keith Garvey:

|
|
|
|
« Last Edit: March 04, 2011, 08:33:49 pm by aremgy »
|
Report Spam
 Logged
|
|
|
|
|


|
|
|
susy
Newbie

Posts: 21

|
|
« Reply #2 on: November 04, 2010, 01:17:13 am » |
|
I'm really sorry but I never remember to come back here and post what I made. I'm glad you liked this, Rich.   |
|
|
|
|
|
|
|

