|
aremgy
|
 |
« on: May 20, 2010, 09:31:10 am » |
|
G L I T T E R Y


This tut was written on October 5, 2009.
It is written using PSP9; I'm sure the same effects are available in other versions.
SUPPLIES
A tube and a closeup (or an image).
I'm using the work of Ismael Rac. You need to purchase a license to use this tube from AMI.
The following filters:
MuRa's - Copies
DSB Flux - Bright Noise
The font "Arial" which, I assume, you already have.
Start with a tube or an image.
Pick a dark color for your foreground, and a contrasting color for your background.
Open a new image, 600 x 250.
Floodfill with your darker color.
Close off your foreground, so you are only working with your background color.
Text Tool:
Create as VECTOR
Font - Arial
Size - 8
Anti-alias - Smooth
Type a "0" (zero).
Objects - Align - Center in Canvas
Layers - Convert to Raster Layer
MuRa's Copies - Tiling (feedback) change Number from 8 to 1.
Duplicate this layer.
On the original layer, use a thin drop shadow (I used 1, 1, 100, 1, black).
Highlight the duplicated layer and duplicate IT twice (for three total layers).
On the top layer, DSB Flux Bright Noise (Intensity 49, click on Mix).
On the middle layer, DSB Flux Bright Noise (click the radial button before Mix a couple of times).
On the bottom layer, DSB Flux Bright Noise (click the same button a couple more times).
Highlight the top layer.
Add a new layer.
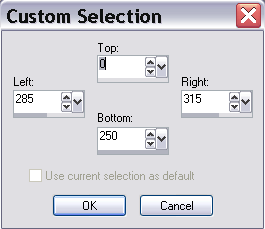
Selections, click on the Custom Selection button found on the Selection toolbar:
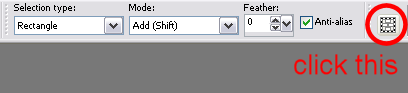
Fill in these numbers in the popup window, and click OK:
Floodfill this selection with your darker color.
Selections - Select None.
MuRa's Copies - Line (change Number from 8 to 7).
Using your Magic Wand, click on the space between the two bars on the right:

Selections - Modify - Expand (by 1)
Floodfill this selection with your darker color.
Select None.
Use your Magic Wand and click on the wider bar you just created.
Add your tube, using the Move tool to move it where you think it looks best.
Selections - Invert
Hit Delete.
Change the blend mode on your tube layer to Luminance (Legacy).
You may, if you wish, also change the opacity.
Add a blurry drop shadow to the layer with the bars (I used 1, 1, 50, 21, black).
Add your tube again, and move the left hand side.
Add a blurry drop shadow (I used 5, 5, 100, 50, black).
Add a new layer.
Add a selection border:
Select All.
Selections - Modify - Select Selection Borders (Inside, 2, Anti-alias UNCHECKED).
Fill with your darker color.
Add the following drop shadows: 2, 2, 58, 3, black and -2, -2, 58, 3, black.
Add your copyright information, your license (if necessary), and your name.
To animate (if you are going to make an avatar, duplicate your tag before animating (Shift + D):
Hide your three "Bright Noise-d" layers and all layers below.
Merge visible.
Hide your three "Bright Noise-d" layers and everything above.
Merge visible.
You should have 5 layers left.
Highlight the top layer.
Hide the middle and bottom animated layers.
Edit- Copy Merged.
In Animation Shop, Edit - Paste As New Animation.
Back in PSP, hide the top and bottom animated layers.
Edit - Copy Merged.
In Animation Shop, Edit - Paste after Current Frame.
Back in PSP, hide the top and middle animated layers.
Edit - Copy Merged.
In Animation Shop, Edie - Paste after Current Frame.
To check your animation, click View - Animation
If it is OK, save as normal.
__________________________________________________________
To make the avatar
Using your duplicated tag, delete everything above the layer with the bars.
Crop to 150x150, moving the handle to where you think it looks best.
Add a selection border and drop shadow as above.
Animate as you did the tag.
You are done! |
|
|
|
« Last Edit: January 19, 2011, 01:16:06 pm by aremgy »
|
Report Spam
 Logged
|
|
|
|
|


|
|
|
|
aremgy
|
|
« Reply #2 on: May 21, 2010, 12:07:35 pm » |
|
Miss Sherri, you're impressing the hell out of me!
these are both stunning!!!
thanks!
R
|
|
|
|
|
huronna
Newbie

Posts: 15

|
|
« Reply #3 on: May 22, 2010, 11:40:46 pm » |
|
Just gorgeous!!
|
|
|
|
huronna
Newbie
Posts: 15
|
|
« Reply #4 on: May 23, 2010, 03:55:59 pm » |
|
I had to play with this one  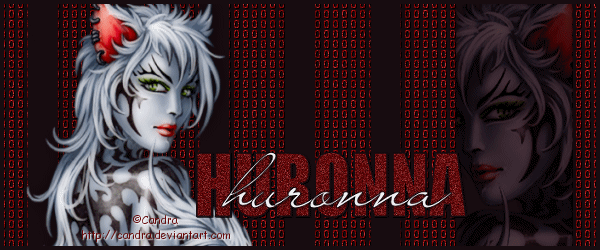 And there are many more that I had not seen... Great tuts Rich |
|
|
|
|
aremgy
|
|
« Reply #5 on: May 24, 2010, 07:08:23 am » |
|
beautiful, miss huronna!
|
|
|
|
|
susy
Newbie
Posts: 21
|
|
« Reply #6 on: January 19, 2011, 06:57:18 pm » |
|
Just wanted to show off my Valentines "Glittery" set These others are beautiful. Thanks Rich for sharing this tut. We're enjoying it tremendously.  Didn't want it to sit back there on page 2. LOL   |
|
|
|
« Last Edit: January 19, 2011, 06:59:07 pm by susy »
|
Report Spam
Logged
|
|
|
|
|
|
|
|
|

