|
aremgy
|
 |
« on: May 20, 2010, 09:57:19 am » |
|
E L E G A N C E

This tut was written on May 17, 2010.
It is written using PSPX; I'm sure the same effects are available in other versions.
SUPPLIES
A tube.
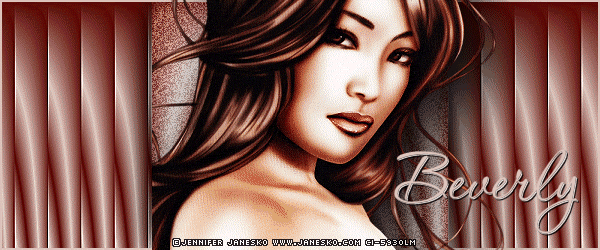
I'm using the work of Jennifer Janesko. You need to purchase a license to use this work from CILM.
The following filters:
Mura's Meister - Copies
DSB Flux - Bright Noise
Font of choice (I'm using "P22 Corinthia")
Let's begin!
Pick two colors from your tube.
Open a new image, 600x250.
Floodfill with a gradient made from your colors (Linear, Angle = 0, Repeats = 8 ).
Using the distortion tool (in PSP X, that's the Pick tool), drag the center node down until the guiding numbers at the bottom of the screen read like this:

Alternatively, enter the following setting into the Pick toolbar:

Effects - Distortion Effects - Polar Coordinates
Check "Polar to rectangular"
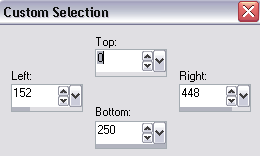
Selection tool - Custom Selection using the following setting:
Selections - Invert.
DELETE.
Duplicate this layer.
Hide the copy.
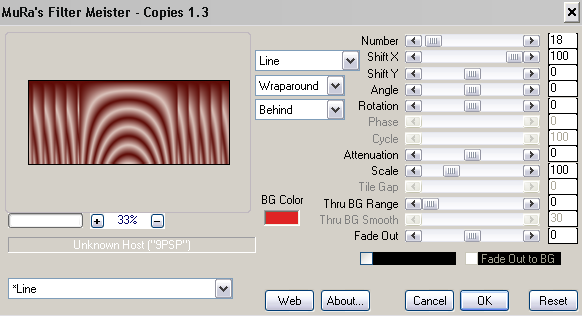
Working on the original layer, Mura's Meister - Copies using the following setting:
Effects - Edge Effects - Enhance.
Highlight the hidden layer, and add your tube as a new layer.
Add a drop shadow.
(I used Eye Candy 5: Impact - Perspective Shadow with the Drop Shadow, Blurry setting.)
Unhide the hidden layer.
Using your magic wand, click on the blank area on the left hand side.
On the tube layer, click DELETE.
Go back to the previously hidden layer.
Duplicate it, hide the copy, and highlight the original layer.
On the original layer, add a blurry drop shadow.
(I used 0, 0, 100, 50, black)
Duplicate the copy layer twice.
On the top copy, DSB Flux - Bright Noise using the following setting:

(You may have to adjust this setting, depending on your tube.)
Repeat on the other two copies, click the radial button before "Lighten" each time.
Add a new layer under your tube.
Add a 2 pixel selection border.
(Selections, Select All.
Selections, Modify, Select Selection Borders - Inside, 2, anti-alias checked.
Fill with lighter color.)
Add your name and all necessary copyright information.
Animate as usual.
For the avatar:
Highlight the bottom layer.
Edit - Copy
Edit - Paste As New Image.
Crop to 150x150.
Add your 2 pixel selections border.
Add your name (or initial.)
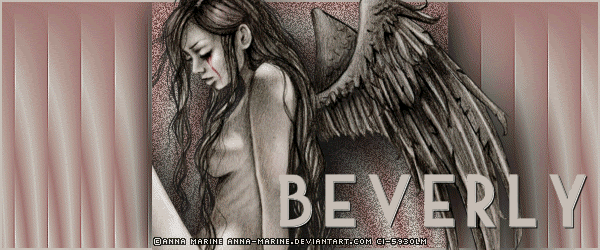
Here is another example, using the work of Anna Marine:

|
|
|
|
« Last Edit: November 15, 2010, 09:35:50 pm by aremgy »
|
Report Spam
 Logged
|
|
|
|
|


|
|
|
|
aremgy
|
|
« Reply #2 on: May 22, 2010, 10:20:21 pm » |
|
gorgeous!
thanks, Miss Sherri!
|
|
|
|
|
|
sherribabe
|
|
« Reply #3 on: May 22, 2010, 10:29:31 pm » |
|
Glad you like!  Despite numerous attempts and following the instructions to a tee, for some reason, I just couldn't get the bottom to curve / angle off properly. Not sure why... So, I finally decided to leave it the way it was. Can't wait to try the new "Geared" tut! It looks AWESOME! |
|
|
|
|
|
|

