|
aremgy
|
 |
« on: May 20, 2010, 09:53:43 am » |
|
THE WAVE


SUPPLIES
A tube (or an image).
I'm using a tube from Irene Shpak.
You need to purchase a license to use this tube from MPT.
You will also need the following filters:
MuRa's Clouds
MuRa's Copies
Greg's Factory Output Pool Shadow
Xero Fritallary
Xero Porcelain
The font of your choice, I'm using "Andantino".
Pick a darker color for your foreground, and a lighter shade of the same color for your background.
Open a new image, 100 width by 200 height.
Select All.
Selections - Modify - Selection Selection Borders (Inside, 5, Anti-alias UNCHECKED).
Floodfill with your darker color.
Add a new layer.
Mura's Clouds (default settings)
Click "Reset" if necessary, to make sure your chosen colors are used.
Add your tube.
Use your move tool to place the tube where you think it looks best.
Change the blend mode of the tube layer to Luminance (Legacy).
You may change the opacity if you wish.
Highlight the bottom layer.
Layers - Arrange - Bring to Top.
Use the following drop shadows: 2, 2, 58, 3, black and -2, -2, 58, 3, black.
Layers - Merge - Merge Visible.
Image - Canvas Size - 600x250 centered.
Duplicate your layer.
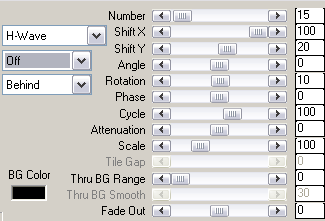
On the top layer, Mura's Copies using the following settings:
On the bottom layer, Mura's Copies with some changes:
Change Shift X to -100
Change Shift Y to -20
Change the opacity of this layer to 50.
Add a new layer
Mura's Clouds (default settings)
Adjust - Add/Remove Noise - Add Noise (Uniform, 12, Monochrome CHECKED).
Greg's Factory Output - Pool Shadow (default settings, but change Intensity to 50).
Xero - Fritallary (default settings)
Effect - Edge Effects - Enhance
Layers - Arrange - Send to Bottom
Add your tube, moving it to the left where it looks best.
Duplicate the tube.
On the bottom layer, Adjust - Blur - Gaussian Blur 25.
On the top layer, Xero - Porcelain (default settings).
Change the opacity of the top tube layer to 75.
Add a new layer.
Add a selection border of 2 (Inside, 2, Anti-alias UNCHECKED).
Add the same drop shadows as earlier.
Add your copyright information, your license (if necessary), and your name.
___________________________________________
Before merging, let's make an avatar.
Duplicate your tag (Shift + D).
Hide every layer except for the background layer.
Crop to 150x150 (using the Width and Height boxes on the Crop toolbar).
Add a selection border of 2, with the same drop shadows.
Add your copyright and license information, if necessary.
Add your name or initial, and you are done! |
|
|
|
|
|


|
|
|
|
aremgy
|
|
« Reply #2 on: May 20, 2010, 07:38:49 pm » |
|
fantastic!
great image...
huggs
R
|
|
|
|
|
Ruby Rose
Newbie

Posts: 6

|
|
« Reply #3 on: June 01, 2010, 04:27:39 pm » |
|
My try on this tut. I love it.   |
|
|
|
|
|
|
|

