|
aremgy
|
 |
« on: April 20, 2011, 10:41:22 am » |
|
S C A L E S


This tut was written on April 20, 2011.
It is written using PSPX; I'm sure the same effects are available in other versions.
SUPPLIES
A tube.
I'm using the work of Keith Garvey.
You may purchase a license to use this work at PTE.
The following filters:
RCS Filter Pak 1.0 - Window ShadesII
Eye Candy 5: Textures - Reptile Skin
Font of choice (I'm using "Kato")
Let's begin!
Choose a light color from your tube and a darker shade of the same color for your background.
Open a new image, 600 wide x 125 high.
Fill with your lighter color.
Image - Canvas Size to 600x250, click on the top center button.
(so that the blank space is at the bottom)
Add a new raster layer, fill with the darker color.
Layers - Arrange - Send to bottom.
Layers - Merge - Merge Visible.
RCS Filter Pak 1.0 - Window ShadesII using the default setting.
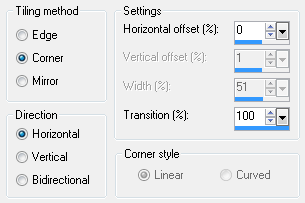
Effects - Image Effects - Seamless Tiling using the following setting:
Using your magic wand, click anywhere on the darker color.
Selections - Modify - Select Color Range using 20, 20, and your darker color in the color box.
DELETE
Effects - 3D Effects - Drop Shadow using 5, 5, 50, 5, black.
Add a new raster layer.
Fill with your darker color.
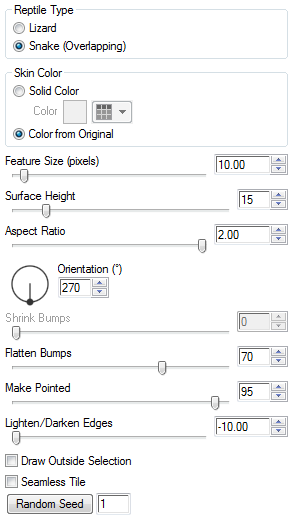
Eye Candy 5: Textures - Reptile Skin using the following settings:
Layers - Arrange - Send to bottom.
Highlight the top layer, change the opacity to 50, depending on the color you used.
Add your tube, moving into position.
Add a blurry drop shadow (I used Eye Candy 5: Impact - Perspective Shadow with the blurry preset.)
Add a new layer.
Selections - Select All.
Selections - Modify - Select Selection Borders using Both Sides, Border Width 2, Anti-alias unchecked.
Fill the selection with your darker color.
Add your name and all necessary copyright information.
For the avatar:
Duplicate your tag (Shift + D.)
Remove all the layer with the tube.
Crop to 150x150.
Add a new layer.
Add a 2px Selection border, using your dark color.
Add your name (or initial) and all necessary copyright information.
Here is another example, using the work of Elias Chatzoudis:


|
|
|
|
« Last Edit: July 11, 2011, 11:05:44 am by aremgy »
|
Report Spam
 Logged
|
|
|
|
|


|
|
|
|
Maria Tereza
Guest
|
|
« Reply #2 on: April 20, 2011, 08:17:30 pm » |
|
Great tut! Thank you my dear friend for the so beautiful new set and thanks for remembering me. Love it!!! Love & hugs.
|
|
|
|
|
|
|
|
aremgy
|
|
« Reply #4 on: April 23, 2011, 08:40:54 am » |
|
oh, my...i LOVE this!
thanks, SB!!
|
|
|
|
|
huronna
Newbie

Posts: 15

|
|
« Reply #5 on: November 05, 2011, 10:01:03 pm » |
|
Nice tutorial 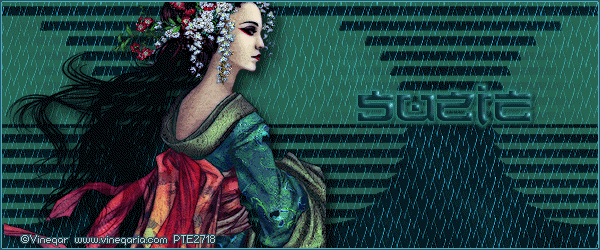 |
|
|
|
|
|
|

